When you think of free-standing wooden steps, you’re probably imagining a set of 3 wooden steps that you can move around. What if I told you it’s possible to DIY this woodworking project?
Building wooden stairs is a challenge, depending on how much detail you’re building. But with a good guide, you can get it done in less time than you’d think!
The good news is, making these wooden stairs is so simple. You only need a little math, some planning, and knowledge of woodworking.

Once you build the stairs, you can move and place them wherever you like.
So let’s get to work!
In this post we'll cover:
Why build free-standing wooden steps?
If you’re a fan of woodworking, building steps is both a fun activity and a money-saving venture.
Building wood steps isn’t as hard as it seems, so you don’t need a specialist. Bringing in a carpenter to do the work for you is costly.
Freestanding stairs are excellent for travel, especially for RVs and trailers. Some people have a hard time reaching up, and steps make it easier and safer. As well, many people need steps they can move around the yard, patio, and even cottages.
Most people build custom outdoor free-standing wooden steps. These stairs are sturdy and you can coat them with a wood protector so they can survive the elements for years.
You can even build some free-standing steps to add to another area of your deck so you can climb up on 2 sides.
How to build free-standing wooden steps
Equipment
- Hammer
- Hand Saw
- Tape measure
- 16d Nails
- Pencil
- Framing Square
- Jigsaw
- Nail gun
- Circular saw
- Chop saw
Materials
- Wood planks
- Nails
Instructions
Step 1: Choosing wood
- You need at least 6 pieces. They’ve got to be perfect and straight, without cracks. Otherwise, they might cause serious problems later. The ideal dimensions are 2x12x16, 2x4x16, and 4x4x16.
Step 2: Calculations and measurements
- Now that you’re done with the tools and supplies, it’s time to do the math.I'm going to show you a way of making reliable estimates. If you prefer exact numbers, however, there are websites where you can key in the numbers and get the exact values.Here’s my method:
- Determine the finished height (from the ground all the way to the leading part where the stairs are running to) then divide the value by 7, which is the height of a regular step.If, for instance, you find that the height is 84, divide that by 7; that gives you 12 steps. Other calculation methods may get a higher or lower number of levels, but the dissimilarity can’t be too much.As I pointed out before, the average step has a height of 7 inches.
- The regular tread depth is 10.5 inches. In case you did precise calculations, you might have something a bit different; for example, 7¼ and 10 5/8.
- The stairs will have 3 stringers, which are meant to give them strength. Each of these stringers is to be made from a single piece measuring 2×12. Outside stringers will have a width of 36 inches, so you’ll need two 2x36x36 to be applied as a header and a footer.
- The legs are going to have a 2×6 piece crossing the bottom, with the purpose of keeping them spread out and uniform.
- You’ll be making the steps out of 2×12 pieces and give them an inch overhang on every side of the stringers.
- Handrails are usually custom for every staircase. What you can do is cut the 2×6 piece for the baluster at around 48 inches and cut it down later for the proper height.
- While cutting the legs that run vertically to the ground, keep in mind the Pythagorean theorem to get the right height concerning the length of the entire staircase and the diagonal height. Remember: a2+b2 = c2.
Step 3: Setup and layout
- With the knowledge of the number of steps you’ll be using and the treads’ measurements, it’s about time you set up the framing square.Having the stair gauges will help you tremendously. They'll lock into place and eliminate human error as you lay out the stringers.
- In case you don’t have stair gauges, I recommend having someone hold the square for you as you mark.
- If you use stair gauges when starting out, don’t introduce them to the project if you happen to get them later. That way, you’ll avoid getting things way off.
- It’s time to lay out the stringers. Take the framing square and place the 10.5 sides on the right, and the 7 side on the left.
- Place the square on the 2×12 going as far to the left as possible. The objective is to make outside the framing square.
- Take the 7-inch side and carry it across, straight all the way. That’s the top step, and you'll cut it out later.
- Align the 7-inch side with the 10.5-inch side and place your marks, up until you achieve your desired number of steps.
- You should do the bottom step just like the top, only that the tread length is to be carried across rather than upward.
- Now that there will be a 2×6 on the top and the bottom as a header and a footer, you’ve got to mark those lines and cut them out to make the project level at the ground.
- The precise measurement for a 2×6 is 1.5×5.5; you’ll need to mark that on the top and the bottom of the step running down the back of the 2×6.
- Now is the right time for taking some height out of the bottom step if you meant to do so. All you need to do is make measurements from the bottom up and mark a line for the 2×6 to be cut in.
Step 4: Cutting
- As you cut the steps, don't cut past the lines you marked. It’s better to return with a hand saw and cut out the little pieces that remain attached. It might be a little annoying, but it’s essential.Remember when I told you to go for wood that has no cracks? Imagine the one you’re using has broken, and then, as you cut, it splits. I bet that's not an inconvenience you’d like to experience, right?
- While you cut the treads along with the header and the footer, another person can be reducing the stringers. And if possible, another one can be working on the legs and balusters.
- While working on the legs, be sure to cut the let-ins accurately.Don’t know what let-ins are? That just refers to a cut-out of 4×4 (width) into the legs. Only half the leg’s thickness is taken out to allow the 2 boards to set into each other firmly.
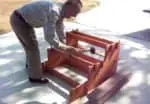
Step 5: Assembling it all
- Begin by positioning the header and footer on the outer stringers and then place the middle stringer in between.
- Be sure to drive three 16d nails in each. You'll find it easier to do that with the parts upside-down, but take care not to break any pieces, or you'll have to cut new ones.
- Flip the entire project over and lay out the treads on the stringers.
- Recall that there’s an inch overhang on both sides of the stringers. Here’s what you can do: nail in one of the sides first, with the correct overhang, then move onto the other side and try getting it as close as you can.
- The board bender can be very helpful here but don’t push it too much, or you'll break the stringers. After nailing the outside stringers, the middle stringer is pretty easy to fasten.
- Don’t forget; 3 nails go into each stringer. Now is the time to add the legs. You want to have another person hold the legs in place as you nail them. Alternatively, you can use scrap blocks.
- If you want the legs to offer your free-standing wooden blocks the right amount of support, you’ve got to ensure they’re correctly attached. Put around 4 on the side of the leg that touches the header and the stringer and about 2 through the top of the tread.
- As you position your legs, it’d be better to have the let-ins face inside than outside, for the sake of beauty. And when nailing the let-ins, nail 1 side, and then fasten the other side from the opposite direction. You’re driving in 2 nails on each side.
Step 6: Final touches
- Let’s stand it up, shall we?When you have it standing, you may go ahead and do the cross-bracing on the vertical legs at the back. That's just a way of boosting the staircase’s strength.To do that, use a tape measure to determine the length of the wood you’ll be needing, cut the wood using the values you get, and nail it appropriately. Alternatively, you can just take a 2×4, lay it against the points, mark it, cut, and fix it.
- The easiest way of adding the handrails is to fix a baluster to the tread, but that looks sort of sloppy. A more difficult but more elegant strategy would be to cut into the tread and nail the baluster into the stringer. That’s not only smarter, but also more robust.
- The number of balusters you need depends on the number of steps you have. The more the steps, the more balusters you'll need.As soon as you have the balusters on, use a tape measure to gauge and mark a suitable height for the handrail. You measure the length from the top to the bottom baluster. As you cut out the wood, don’t forget to leave 2 inches for overhang.
- Cut two 2×4 pieces to the suitable length and nail each of them to one side, ensuring they’re on the outer side of the balusters.
Check out this video by YouTuber Rmarvids to see him in action building wood steps:
Getting the right tools and supplies
Check out this all-purpose hammer by Irwin, as it’s sturdy, has a non-slip handle, and is perfect for nailing your wooden steps:

The followings are other must-haves:
- Hand saw
- Tape measure
- 16d nails
- Pencil
- Framing square
- Jigsaw
- Nail gun
- Circular saw
- Board bender
- String line
- Chop saw
This chop saw by Porter-Cable is affordable and perfect for woodworking. For any carpentry-related tasks, you’ll need a chop saw that’s easy to use:

Read more: Guide about hard hat color codes
FAQs about making freestanding wooden steps
What’s the best angle for wooden steps?
The angle of your wooden steps matters. The angle determines how easy or hard it is to climb up and down the steps.
If you want a comfortable staircase, your angle must be at a minimum of 30 degrees. Ideally, your angle is between 35-50 degrees, depending on the height and width of your staircase.
What’s the best wood to use for outdoor steps?
Carpenters recommend that you choose from one of 3 types of wood for outdoor steps: redwood, cedar, and yellow pine.
The reason for this is that these 3 kinds of wood are highly resistant to damage, especially weather damage. As well, it’s easy to work with this type of wood.
And finally, these woods are long-lasting, so they can last a lifetime. Although it’s recommended that you treat the wood so it resists the elements, you don’t have to. Even untreated cedar or redwood lasts many years.
Yellow pine is a universal type of wood used for outdoor construction. It’s very dense compared to other types of wood and it can withstand all kinds of harsh climates and even the woodworking process. It doesn’t break or flake easily so carpenters love using this lumber.
How can we make wooden steps non-slip?
One of the most common problems is slippery stairs. Many people fall and suffer serious injuries from their steps.
What you need to do is apply a non-skid adhesive strip to the stairs. Each step needs a strip near the edge.
Alternatively, you can coat your steps with floor paint that has some added grit to it. Once the steps are dry, paint the whole step, including underneath, the tops, and the ends.
How do I maintain my free-standing wooden steps?
To protect your freestanding wooden stairs, you need to apply protective coating. Varnish or wood oil is the most popular type of protection.
Wood oil is excellent to use because if you apply a couple of coats, the wood will last for many years, and it offers protection against the weather.
Oil is a good option because the pores in the wood soak up the oil. This prevents the wood from absorbing water, which then prevents the wood from rotting and growing fungus. As well, the oil keeps the lumber strong and sturdy, which means your stairs will last long.
Feel good about building your own free-standing steps
Congratulations, you’re all done! It’s time to load it onto your truck and move it to your guard tower, treehouse, or whatever place you have in mind.
Thanks for reading. I hope that this post helped you build something magnificent.
Also read: these garage door rollers will keep your garage working like a charm

I'm Joost Nusselder, the founder of Tools Doctor, content marketer, and dad. I love trying out new equipment, and together with my team I've been creating in-depth blog articles since 2016 to help loyal readers with tools & crafting tips.