I love creating free content full of tips for my readers, you. I don't accept paid sponsorships, my opinion is my own, but if you find my recommendations helpful and you end up buying something you like through one of my links, I could earn a commission at no extra cost to you. Learn more
There is 4 most common PEX connection including crimp PEX, stainless steel clamp, push-to-connect, and cold expansion with PEX-reinforcing rings. Today we will discuss only the crimp PEX joint.
In this post we'll cover:
6 Steps to Crimp PEX
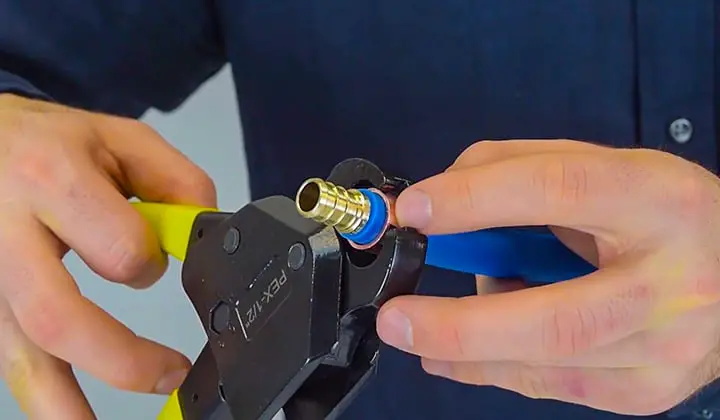
You need a pipe cutter, crimp tool, crimp ring, and a go/no-go gauge to make a crimp PEX joint. After gathering the necessary tools follow the steps discussed here consequently. Step 1: Cut the Pipe to the Desired Length Determine the length to which you want to cut the pipe. Then pick up the pipe cutter and cut the pipe to the required length. The cut should be smooth and square to the end of the pipe. If you make it rough, jagged, or angle you will end up making an imperfect connection that you must want to avoid. Step 2: Select the Ring There are 2 types of copper crimp rings. One is ASTM F1807 and the other is ASTM F2159. The ASTM F1807 is used for metal insert fitting and the ASTM F2159 is used for plastic insert fitting. So, select the ring according to the type of fitting you want to make. Step 3: Slide the Ring Slide the crimp ring almost 2 inches past over the PEX pipe. Step 4: Insert the Fitting Insert the fitting (plastic/ metal) into the pipe and keep sliding it until it reaches a point where the pipe and the fitting touch each other. It is difficult to determine the distance as it varies from material to material and manufacturer to manufacturer. Step 5: Compress the Ring Using Crimp Tool To compress the ring center the crimp tool’s jaw over the ring and hold it at 90 degrees to the fitting. The jaws should be closed completely so that a perfectly tight connection is made. Step 6: Check Each Connection Using a go/no-go gauge verify that each connection is made perfectly. You can also determine whether the crimping tool needs recalibration or not with the go/no-go gauge. Remember that a perfect connection does not mean an extremely tight connection because an extremely tight connection is also harmful as a loose connection. It may make the pipe or fitting damaged resulting in a point of leakage.Types of Go/No-Go gauge
Two types of go/no-go gauges are available in the market. Type 1: Single Slot – Go / No-Go Stepped Cut-Out Gauge Type 2: Double Slot – Go/ No-Go Cut-Out GaugeSingle Slot – Go / No-Go Stepped Cut-Out Gauge
The single-slot go/no-go stepped cut-out gauge is easier and faster to use. If you crimp perfectly you will notice that the crimp ring enters the U-shaped cut-out up to the line between the GO and NO-GO markings and stop midway. If you notice that the crimp is not entering the U-shaped cut-out or if the crimp is over-compressed that means you didn’t crimp correctly. Then you should disassemble the joint and start the process again from step 1.Double Slot – Go/No-Go Cut-Out Gauge.
For double slot go/no-go gauge you have to perform a Go test first and then a no-go test. You must reposition the gauge before performing the second test. If you notice that the crimp ring fits into the “GO” slot and you can rotate around the circumference of the ring that means the joint has been made correctly. If you notice the opposite, that means the crimp does not fit into the “GO” slot or fits into the “NO-GO” slot that means the joint has not been made correctly. In that case, you have to disassemble the joint and start the process from step 1.Importance of Go/No-Go gauge
Sometimes plumbers ignore the go/no-go gauge. You know, not testing your joint with the go/no-go gauge may lead to dry fits. So, we will highly recommend having the gauge. You will find it in the nearby retail shop. If you cannot find it in the retail shop we will suggest you order online. If you have forgotten to take the gauge by any chance you can use a micrometer or vernier to measure the outside diameter of the crimp ring after completing the crimping operation. If the joint is made properly you will find the diameter falls in the range mentioned in the chart.| Nominal Tube Size (Inch) | Minimum (Inch) | Maximum (Inch) |
| 3/8 | 0.580 | 0.595 |
| 1/2 | 0.700 | 0.715 |
| 3/4 | 0.945 | 0.960 |
| 1 | 1.175 | 1.190 |
Final Words
Fixing your final target before starting the project is important to make the project successful. So, fix your target first, and don’t be hurry even if you are a skilled installer. Take enough time to check the perfection of each joint and yes never ignore the go/no-go gauge. If dry fits occur accident will happen and you won’t get time to fix it.
I'm Joost Nusselder, the founder of Tools Doctor, content marketer, and dad. I love trying out new equipment, and together with my team I've been creating in-depth blog articles since 2016 to help loyal readers with tools & crafting tips.