Removal of sealant is usually necessary because the sealant is no longer intact. You often see that pieces are missing or that there are even holes in the sealant.
Also, the old sealant may be completely moldy.
You must then take action to prevent a leak or bacterial breeding ground. Before new silicone sealant is applied, it is important that the old sealant is 100% removed.
In this article I explain step by step how you can best remove sealant.
In this post we'll cover:
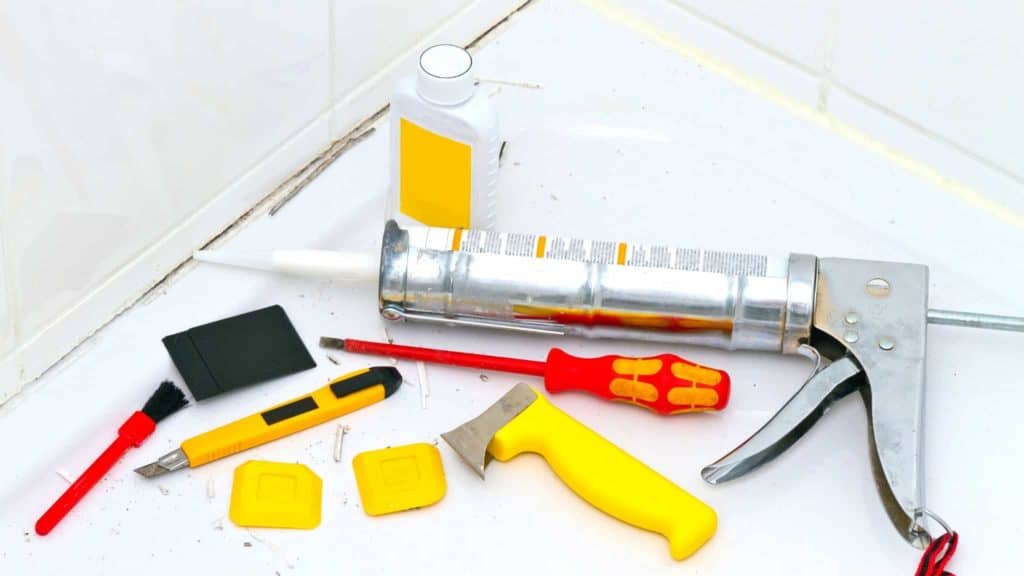
What do you need to remove silicone sealant?
- Snap-off knife and/or glass scraper
- Hot water with soda
- All-purpose cleaner or degreaser (these top choices work well)
- Wipes)
- Screwdriver
- Kit remover or salad oil
My favorites, but you can of course try other brands:
Cut-off knife from Stanley, preferably this Fatmax that gives a better grip with 18mm:

For sealant, the best degreaser is this one from Tulipaint:

What is silicone sealant?
Silicone sealant is a strong liquid adhesive that acts like a gel.
Unlike other adhesives, silicone retains its elasticity and stability at both high and low temperatures.
In addition, silicone sealant is resistant to other chemicals, moisture and weathering. So it will last a long time, but not forever, unfortunately.
Then you have to remove the old sealant and reapply.
The step-by-step plan
- Take a snap-off knife
- Cut in the old silicone sealant along the tiles
- Cut in the old sealant along the bath
- Take a small screwdriver and pry off the kit
- Pull out the kit with your fingers
- Scrape away old sealant with a utility knife or scraper
- Thoroughly clean with all-purpose cleaner/degreaser/soda and cloth
Alternative way: soak the sealant with salad oil or sealant remover. The silicone sealant is then easier to remove.
Maybe not necessary, but for the successful removal of stubborn sealant, this sealant remover from HG is the best choice:
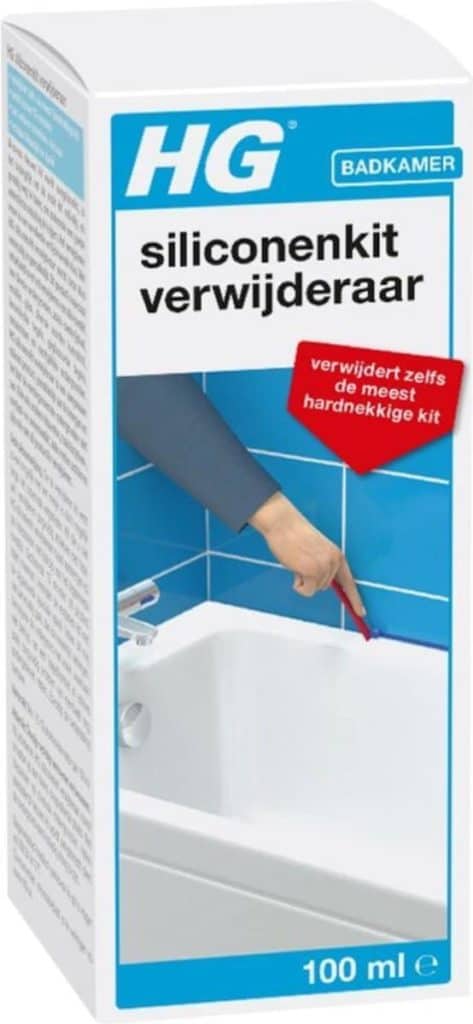
You can also use this silicone sealant remover to remove those last small pieces of sealant.
When you have already scraped off the large layer with a knife, you can remove the last remnants of sealant with the sealant remover.
Attention: before applying a new sealant, the surface must be very clean and degreased! Otherwise the new sealant layer will not adhere properly.
It is also important to let the new sealant dry well. The humidity in the house is important here, just like when painting.
Different ways to remove old sealant
Removing silicone sealant can be done in many ways.
Remove kit with snap-off blade
One of those methods is that you cut along the sealant edges with a snap-off knife or Stanley knife. You do this along all adhesive edges.
You often cut along the corners, as it were, in a V-shape. Then take the very tip of the kit and pull it out once.
Usually if it has been done well, in one smooth movement, then this is possible.
Residual sealant may remain and you can carefully scrape it off with a knife or remove it with a sealant remover.
It is important that you read the instructions on the packaging before using the product.
Remove sealant with a glass scraper
You can also remove the sealant with a glass scraper. You have to be careful with this and make sure that you do not damage the materials, such as tiles and bath. After this, take warm water with soda.
You soak a cloth in the water with soda and go through the slot where the old sealant used to be. This method is very effective and the sealant residues disappear.
Salad oil works wonders against adhesive
Take a dry cloth and pour plenty of salad oil over it. Rub the cloth firmly over the sealant a few times so that it is well wet from the oil. Then let it soak for a while and you often pull out the sealant edge or sealant layer completely.
Remove hard sealant
Hard sealants such as acrylic sealant can be removed with a sanding block, sandpaper, utility knife, putty knife or a sharp screwdriver/chisel.
Apply force with policy to prevent damage to the substrate.
Before applying the new layer of sealant
You can therefore remove a kit in various ways.
Before you apply the new sealant, it is really important that you have completely removed the old sealant!
Also make sure that the surface is 100% clean and pure. Especially after using salad oil, make sure it is well degreased.
To start with, cleaning with soda is recommended. You can also use a good all-purpose cleaner or degreaser. Repeat cleaning until the surface is no longer greasy!
Ready to apply the new sealant? This way you can make silicone sealant waterproof in no time!
Preventing mold in the bathroom
You often remove sealant because there are molds on it. You can recognize this by a black color on the sealant layer.
Especially in bathrooms, this is quickly the case due to the humidity.
A bathroom is a place where a lot of water and moisture is present on a daily basis, so there is a good chance that you will get mold in the bathroom. Your humidity is then high.
The prevention of molds is important because they are dangerous to health. You can prevent molds in bathrooms, for example, by good ventilation:
- Always keep a window open when showering.
- Dry the tiles after showering.
- Leave the window open for at least another 2 hours.
- Never close the window, but leave it ajar.
- If there is no window in the bathroom, purchase mechanical ventilation.
The main thing is that you ventilate well during and shortly after showering.
With a mechanical shower fan you can often set the duration. Often a mechanical ventilation is connected to a light switch.
Conclusion
It may be a bit of a job, but if you work thoroughly you will easily remove that old sealant layer. Once the new kit is on, you’ll be glad you made the effort!
Prefer to leave the silicone sealant and paint over? You can, but you have to use the right method

I'm Joost Nusselder, the founder of Tools Doctor, content marketer, and dad. I love trying out new equipment, and together with my team I've been creating in-depth blog articles since 2016 to help loyal readers with tools & crafting tips.