The braking system is one of the most crucial components of a vehicle. It’s made of various components, and each part has a unique function. These parts work together to form a brake system that keeps us safe on the road.
If you own a car or drive one, you’ve probably experienced a very common brake system failure problem called Brake Caliper Failure. In this problem when you break your car, it will move more to one side, and the brakes will not fully release once you let off the brake pedal.
In this post, I’ll explain how to resolve this issue and answer all of your questions, such as ‘how to compress brake caliper with C clamp’ and others. So, without further ado, continue reading this really helpful post.
In this post we'll cover:
Why Isn’t Your Brake Caliper Compressing?
As you deal with this issue, you may wonder why the brake caliper isn’t working properly. There are a lot of reasons that can cause this problem. Car immobility is one of the main causes of this problem. The brake caliper may rust if you do not drive the car for an extended period. This pitting or rust will stop your vehicle’s brake caliper from compressing and when this happens you will face this possibly deadly situation.
Cars sticky piston is another major cause of this brake not compressing issue. Also, a fault with the caliper bolt of your car’s braking system can trigger this problem.
Compress Your Brake Caliper With C Clamp
In this part of the post, I’ll show you step by step how you can compress your vehicle’s brake caliper just using a C clamp on your own.
Step One
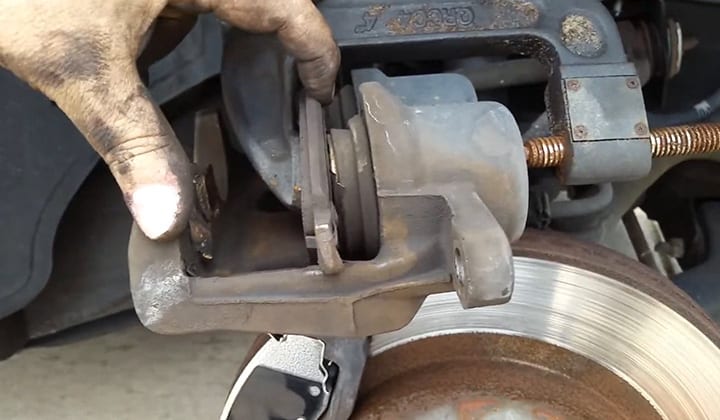
First, inspect the inner lining of your vehicle’s brake caliper, where you will find a cylindrical-shaped valve or piston. This piston is very flexible, which helps the piston itself to adapt to the car’s braking pad. Now you have to readjust the cylinder-shaped piston to its initial or original position and the brake pads must be placed over the brake disc.
Step Two
Find the brake hydraulic fluid reservoir, which should be located near the cylinder-shaped valve or piston. Now you have to remove the hydraulic fluid reservoir’s protective cap. You must ensure that the covering cap is open, otherwise, when you run the brake caliper compressor you will feel enormous strain or pressure in the hydraulic fluid reservoir.
Step Three
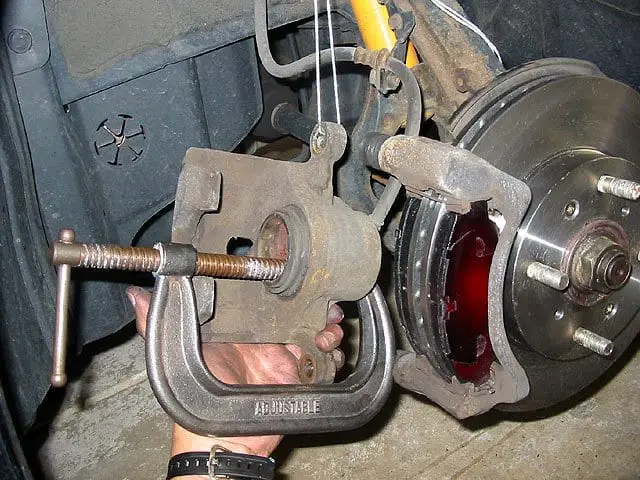
Now place the edge of your C Clamp against the cylindrical piston and then over the brake caliper. Put a wooden block or some other object in between the brake piston and the C clamp. It will protect the brake pad or the piston surface from dents or holes created by the clamp.
Step Four
Now you have to fix the screw on the brake caliper’s top. To do that start rotating the screw using the C clamp. Keep turning the screws till the piston is properly adjusted to accept the new brake pad. This rotation of screws will raise the pressure in your vehicle’s braking system and compress the brake’s piston or valve to your specifications. As a result, you will get rid of this savior problem
You should be very gentle and careful during this process. If you are not careful and delicate your vehicle’s brake system may be permanently damaged.
The Final Step
Finally, you must seal the protective cap of the hydraulic fluid reservoir to prevent dirt from getting into it. And release your C clamp from the piston or brake caliper. In this way, you can easily fix your vehicle’s brake caliper not compressing problem using only a C clamp.
Bonus Tips For Compressing The Caliper
- Before starting to compress the caliper, clean the valve or piston of your vehicle’s braking system.
- Add some machine oil or grease to the caliper for optimum compression.
- Make sure the brake fluid cap is securely closed once the caliper compression procedure is completed.
- Use a hammer softly and slowly to assist you to replace the pins or bolts that are holding the brake pads in place.
- After you’ve finished placing all of the car parts back in their proper places, go for a test drive.
Frequently Asked Questions (FAQ)
Q: Is it possible that a jammed caliper can fix itself?
Answer: Sometimes it fixes itself temporarily but it will happen again. So, unless you address the problem, you risk having a sudden brake failure, which might result in severe injury.
Q: How will I know whether my brake caliper is sticking or not?
Answer: If your brake caliper stops operating correctly, you may experience a variety of issues, including pedal remains down, hydraulic fluid leakage occurs often, the vehicle will be difficult to stop, vehicles will create high-frequency sounds, and sometimes you will smell of burning.
Q: How long will it take to repair my brake caliper with a C clamp?
Answer: The time it takes to repair your car’s brake caliper is mostly determined by your mechanic’s experience. It also depends on the model of your automobile and the sort of braking system you have. Generally, it takes anywhere between One to Three (1 – 3) hours to replace a brake caliper.
Conclusion
A brake caliper is a very important component of a vehicle’s braking system. It helps us to stop our car when we need to and keeps us all safe from an incident. However, sometimes it stops functioning due to some particular reasons which might result in a critical accident.
Fortunately, repairing your brake caliper is quite simple. Using a C clamp and the correct method, which I briefly described in my post, you can achieve this. However, if you believe that this type of problem is too difficult for you, I strongly advise you to get assistance from an expert technician.
Also read: these are the best C Clamps to buy right now

I'm Joost Nusselder, the founder of Tools Doctor, content marketer, and dad. I love trying out new equipment, and together with my team I've been creating in-depth blog articles since 2016 to help loyal readers with tools & crafting tips.