You might be familiar with several types of cut on wood that can be performed on a table saw, including straight cuts, curve cuts, wood ripping, resawing, circle cutting, and many more. A taper cut is something like ripping wood blanks but not the regular rip cut that we generally have.
There is a huge chance of causing a wrong cut on your wood blank if you don’t know how to cut a taper on a table saw — because setting up the right blade, considering some key points, and maintaining proper guidelines are necessary for this cutting process.
This article will discuss all the essential procedures of cutting a taper on a table saw, including some required tips and tricks.
In this post we'll cover:
Why Taper Cutting Is Difficult?
When we make a rip cut on a woodblock, but not on a straight line but creating an angle between the edges, that is mainly defined as a taper cut.
Honestly speaking, taper cutting is not difficult if you follow the right procedures and practice several times. But it might be tough for beginners due to a lack of enough practice and knowledge.
Before approaching the cutting process, you need to know why certain methods are there for taper cutting and why it is considered a tough process.
- As we know, a workpiece should be pushed towards the blade while straight cuts. In the same way, only pushing at an angle with both edges is not enough for a taper cut. It can be really dangerous as you might experience a kickback suddenly.
- Avoiding rough edges and uneven cuts is relatively easier with other cuts, while you will find it a bit tough to cut a taper. As we need to cut through an angle, maintaining the proper measurement is difficult.
The blade runs fast, and coping up with speed by pushing it is not always possible. Sometimes, you might lose control while the blade is going through the workpiece. As a result, the wood blank will end up having several irregular cuts.
Cutting a Taper
Almost in every wood workshop, taper cutting is a regular activity as tapers are used in various furniture and cabinet fittings. A taper blank is necessary when you can’t fit a regular-sized wood board while attaching furniture pieces. Because of the angle, tapers need less space and can be fitted easily in a tight dimension.

You can easily cut a taper with your table saw by following these steps with some essential tools. If the tools are not available at home, you can find them at your nearest workshops.
Things You Will Need
- Marker pen
- Tapering jigs
- Screws
- Drill machine
- Push stick
- Hand gloves
- Safety glasses
Step 1 – Measuring and Marking
When you have decided which wood blank you want to cut, measure it and mark accordingly. Marking ensures some accuracy as it makes things easier while pushing the blank towards the blade. First, mark two points on both edges at the angle of your desired taper and then connect the marks.
Step 2 – Selecting the Essential Part
From a wood blank, you will get two similar pieces after a taper cut. But if you need one piece for your job and leave the other piece, you better mark the essential one. Otherwise, you might get confused between the pieces as they are of the same measurements.
Step 3 – Adjusting the Sled
A sled for the table saw ensures more accuracy and preciseness to crosscuts, taper cuts, and angled cuts. Besides, it is like a safety gear that prevents any injuries to your fingers while working on the saw.
Adjust your table saw sled on a wooden flat base platform. You need to choose the base according to the blank size because it should be larger than the blank.
Step 4 – Aligning the Blank
For ensuring a stationary workpiece, the blank needs to be attached with the guide. Use some wood screws to connect the blank in such a way that the marked line is parallel to the sled edge.
When you align the blank, the taper line should be over the sled edge because this prevents the sled from being cut with the blank. You can attach the other side of the blank so that the essential piece remains damage-free.
Step 5 – Adjusting the Fence and Clamp
In every type of cut on a table saw, the workpiece might slide over the table while you are running the blade. This creates sudden rough cuts on the wood, and sometimes you can’t fix those by sanding. So, it is necessary to adjust the fence on the saw.
Generally, table saws have built-in fence adjustments, including telescoping fence, rip fence, T-square type fence, and many more. But in case you don’t have one, use a clamp instead. While adjusting the fence, notice the width of the guide board for setting in the accurate position.
Step 6 – Using the Sled
If you are going to have a single taper cut, you have to use the sled once. In this case, run the blade and cut the blank after you set up the fence. Before turning on the table saw, remove the guide board.
You need to use the sled a few times for several taper cuts by adding some blocks with it. The main advantage of using blocks is that you don’t have to take measurements and set up every blank before cutting. They allow easy positioning of your workpiece within a short time.
Step 7 – Positioning the Blocks
Making blocks is super easy as you will only need two offcuts which will be smaller and thicker than the blank. The blocks should have a straight edge so that they can be placed against the edge of the blank easily. Attach the blocks to the guide with wood screws.
For cutting each blank, you just have to attach it with screws after keeping it against the edge of the blocks.
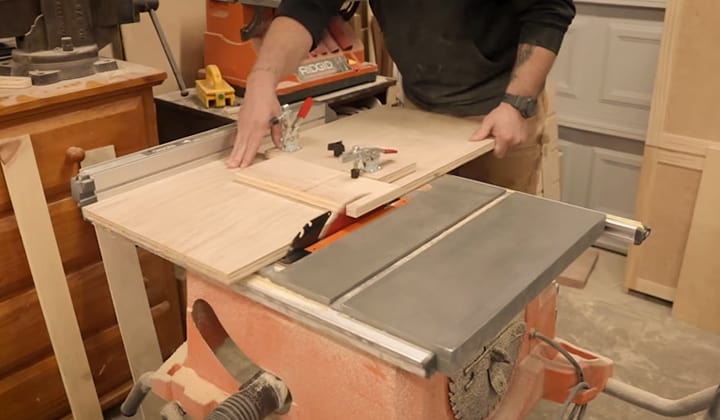
Step 8 – Using the Tapering Jig
For perfect taper cuts, a tapering jig is a useful tool that helps with deeper cuts and provides straight edges to any surface, even rough and bumpy. Besides, it ensures your safety from the saw blade while you are working on a table saw.
For aligning the fence and the saw blade, use the tapering jig, and it will do its job by holding the blank at the specific angle of your desired cut.
Step 9 – Adjusting the Saw Blade
The distance between the saw blade and the blank should be minimum as it ensures a flawless cut and maintains your safety. Align the blank with the saw blade so that the blade will pass through the taper line while cutting.
Maintain proper blade tension while setting up. If you set the blade with the guard too tight, it might crack during cutting. So, maintain an optimum blade tension.
Step 10 – The Final Cut
After all the settings and adjustments of the necessary equipment, everything is ready for the cutting session. Turn on the table saw and cut the taper by slowly pushing the blank towards the blade. Start cutting after the blade reaches its maximum speed.
Tips and Tricks
During the whole cutting process of the taper, it is necessary to remember some key points along with several tips and tricks for making things easy. These will help you avoid some common mistakes and keep you safe while working on your table saw.
- Adjust the sled depending on how many pieces of blanks you want to cut down. For multiple cuts, it is better to install the sled in a semi-permanent way so that it serves you well even after cutting several tapers.
But for single taper cuts, keep the sled installation process basic. In this case, you don’t even need to use blocks as they help cut numerous tapers.
- Use a push stick to drive the blank towards the blade. It will make the task easier and keep your hand safe from the saw blade by maintaining a safe distance.
- If screw holes are not an issue for your job, you can use the discarded piece of the blank after cutting because the blank is cut into two similar pieces with the same measurement just without those holes.
- Don’t start and stop continuously while running the blade. It will damage the actual shape of your blank and cause rugged edges. Use sandpaper to sand the edges in case of rough and uneven cuts on the blank.
- While you have cut one taper and are moving to cut the next one, unscrew the discarded piece used with your previous cut. Now attach the next blank for cutting by reusing the sled.
Final Words
There are various applications of table saws. You may find a particular cut difficult with a table saw but if you are an expert it won’t be impossible for you for most of the cases.
With these procedures and guidelines stated above, cutting a taper can become an easy task for you. So, how to cut a taper on a table saw? I hope this article helped you regarding this so that you never experience any difficulty while dealing with tapers.

I'm Joost Nusselder, the founder of Tools Doctor, content marketer, and dad. I love trying out new equipment, and together with my team I've been creating in-depth blog articles since 2016 to help loyal readers with tools & crafting tips.