How do I identify wood rot and how do you prevent wood rot for outdoor painting?
I always say prevention is better than cure.
By that I mean that you carry out the preparatory work well as a painter, you also do not suffer from wood rot.
Especially at points that are sensitive to this, such as connections of window frames, near fascias (under gutters) and thresholds.
Thresholds in particular are very sensitive to this because this is the lowest point and there is often a lot of water against it.
In addition, a lot is walked on, which is not the intention of a threshold.
In this post we'll cover:
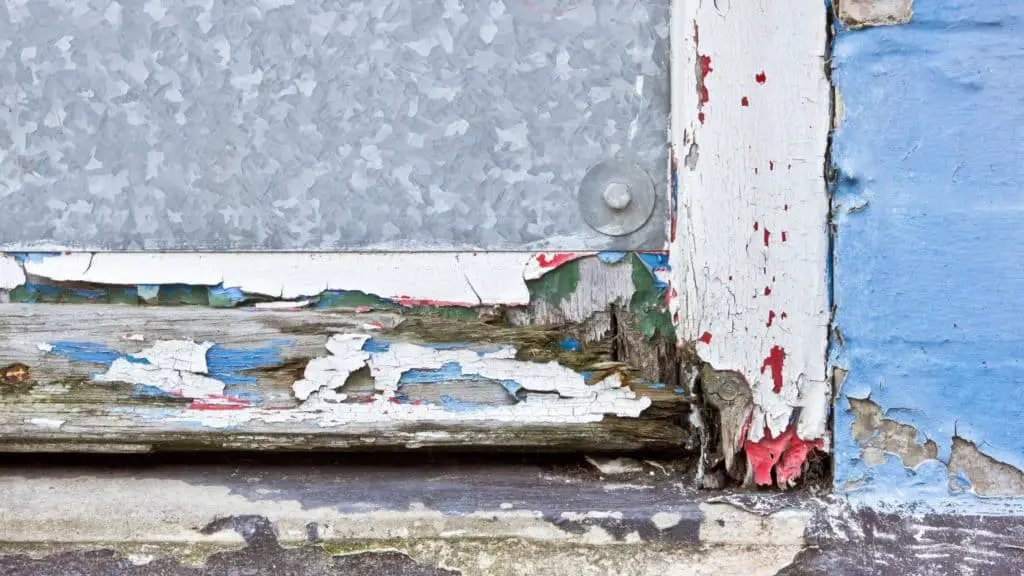
How do I detect wood rot?
You can recognize wood rot yourself by paying attention to the paint layers.
For example, if there are cracks in the paint layer, this may indicate wood rot.
Even when the paint comes off, the peeling of the paint layer can also be a cause.
What you also have to pay attention to is the wood particles that come off.
Further signs can be blisters under the paint layer and discoloration of wood.
If you see the above, you must intervene as soon as possible to prevent worse.
When does wood rot occur?
Wood rot often goes unnoticed and is one of the main problems of the woodwork on your home or garage.
The cause of wood rot is often in the poor condition of the paintwork or in defects in the construction, such as open connections, cracks in woodwork, etc.
It is important that you see wood rot in time so that you can treat and prevent it.
How do I treat wood rot?
The first thing to do is to remove the rotten wood to within 1 cm of the healthy wood.
The best way to do this is with a chisel.
Then you clean the surface.
By that I mean that you remove or blow out the rest of the wood chips.
Then you degrease well.
Then apply a primer to prevent further damage.
Apply primer in thin layers until the wood is saturated (doesn’t absorb anymore).
The next step is to fill the hole or holes.
I sometimes also use PRESTO, a 2-component filler that is even harder than the wood itself.
Another product that is also good and has a fast processing time is dryflex.
After drying, sand well, prime 1 x, sand between coats with a P220 and 2 x topcoats.
If you perform this treatment correctly, you will see that your paintwork remains in top condition.
Do you want more tips or do you have questions?
How do you repair wood rot on an outside frame?
If there is wood rot on your outside frame, it is a good idea to repair it as soon as possible. This is necessary for proper maintenance of your frame. Even if you want to paint the outside frames, you must first repair the wood rot. In this article you can read how you can repair wood rot and what equipment you need for this.
Tip: Do you want to tackle it professionally? Then consider this epoxy wood rot set:
The step-by-step plan
- You start by sticking out the very rotten spots. You cut this out with a chisel. Do this to the point where the wood is clean and dry. Wipe the loosened wood away with a soft brush. Check carefully whether all the rotten wood is gone, because this is the only way to stop the rotting process from within. If a piece of rotten wood remains, you can start again with this job in no time.
- Then treat all protruding spots with wood rot stop. You do this by pouring some of this stuff into the plastic cap and then soaking it in and on the wood with a brush. Then let it dry for about six hours.
- When the wood rot plug has dried completely, prepare the wood rot filler according to the instructions on the packaging. Wood rot filler consists of two components that you have to mix in a 1:1 ratio. With a narrow putty knife you apply this to a wide putty knife and you mix this until an even color is created. Please note that the amount you have created must be processed within 20 minutes. as soon as you mix the two parts well, the hardening starts immediately.
- Applying the wood rot filler is done by pushing the filler firmly into the openings with the narrow putty knife and then smoothing it out as smooth as possible with the wide putty knife. Remove the excess filler immediately. Then let it dry for two hours. After those two hours, the filler can be sanded and painted over.
- After you have waited two hours, sand the repaired parts with a 120-grit sanding block. After this, clean the entire frame and let it dry well. Then you sand the frame again with the sanding block. Wipe off all dust with a brush and wipe the frame with a damp cloth. Now the frame is ready to be painted.
What do you need?
You will need a number of items to repair the exterior frames. These are all for sale in the hardware store,
And check that everything is clean and undamaged.
- Wood rot plug
- Wood rot filler
- Sanding block with grain 120
- wood chisel
- round tassels
- wide putty knife
- Narrow putty knife
- work gloves
- Soft brush
- A cloth that does not fluff
Additional tips
Keep in mind that it takes a long time for the wood rot filler to dry completely. It is therefore wise to do this on a dry day.
Are there many large holes in your frame? Then it is best to fill it in several layers with the wood rot filler. You should always leave enough time in between for it to harden.
Do you also have edges or corners in the frame that are damaged? Then it is best to make a mold of two planks in the place of the frame. You then apply the filler tightly against the planks and after the filler has cured well, remove the planks again.
How do you solve wood rot repair and what is the result after the wood rot repair.
I was called by the Landeweerd family in Groningen with the question if I could also repair her door, because it was partially rotten. At my request a photo was taken and I immediately emailed back that I can carry out that wood rot repair.
Preparation wood rot repair
You should always start with a good preparation and think in advance what you need for a wood rot repair. I used: chisel, hammer, scraper, Stanley knife, brush and can, all-purpose cleaner (B-clean), cloth, quick primer, a 2-component filler, screw drill, a few screws, small nails, paints, sandpaper grit 120, sander, mouth cap and high gloss paint. Before I start with the wood rot repair, I first remove the rotten wood. I did it here with a triangular scraper. There were places where I had to cut down to the fresh wood with the chisel. I always cut up to 1 centimeter in the fresh wood, then you know for sure that you are in the right place. When everything was scraped off, I sanded off the small remnants with sandpaper and made everything dust-free. After that I applied a quick soil. The preparation is now complete. See movie.
Filling and sanding
After half an hour the quick soil is dry and I first placed screws in the fresh wood. I always do this, if possible, so that the putty adheres to the wood and screws. Because the front bar was no longer a straight line, because it ran obliquely, I applied paint to get a straight line again from top to bottom. Then I mixed putty in small portions. Pay attention to the correct mixing ratio if you do this yourself. The hardener, usually a red color, is only 2 to 3%. I do this in small layers because the drying process is faster. When I have applied the last layer tightly, I wait at least half an hour. (Fortunately the coffee was good.) Click here for the film part2
Last phase of wood rot repair with a tight end result
After the putty has cured, I carefully cut a cut between the putty and the paints so that the putty does not break off when removing the paints. Here I sanded everything flat with the sander. I used sandpaper with a grain of 180. After that I made everything dust-free. After waiting 30 minutes, I degreased the entire door with an all-purpose cleaner. The sun was already shining, so the door was dry quickly. Then sanded the entire door with 180 grit sandpaper and wiped it wet again. The last step was to finish with a high gloss alkyd paint. The wood rot repair was completed.

I'm Joost Nusselder, the founder of Tools Doctor, content marketer, and dad. I love trying out new equipment, and together with my team I've been creating in-depth blog articles since 2016 to help loyal readers with tools & crafting tips.