Pyrography is where you decorate or design materials (especially woods) with burn marks by a heated object. This 17th-century art technique has continued its legacy to this day.
The term originated from the Greek words “pur” (fire) and “graphos” (writing), which equals “writing with fire”. From the time of the Han dynasty, it was known as “fire needle embroidery” in China.
Before the term “pyrography”, the name “pokerwork” had been most widely used.
Back then, people used to work with heated metal pokers to get soldering jobs done. As you can imagine, it was a difficult and lengthy process to reheat the poking object again and again.
Modern technology offers a various range of products such as wire-nib burners, laser cutters, and wood burner pens.
In this post we'll cover:
- Discovering the Art of Pyrography
- The Fiery Origins of Pyrography
- Pyrography on Wood: Tips, Techniques, and Safety
- Leather: A New Level of Pyrography
- The Tools of the Trade: Pyrography Equipment
- Mastering Pyrography: Tips and Tricks for Woodburning
- Pyrography: Answering Your Burning Questions
- What are the essential materials and tools needed to start pyrography?
- What are some tips for beginners who want to start pyrography?
- What are some common mistakes beginners make in pyrography?
- What is the difference between pyrography and woodburning?
- What are some pros of using pyrography as a medium?
- Conclusion
Discovering the Art of Pyrography
Pyrography is the art of burning designs onto wood, leather, metal, or other materials using a heated tool. It is a form of art that has been around for centuries and has evolved into a popular hobby for many people today. The word pyrography comes from the Greek words “pyro” meaning fire and “graphos” meaning writing.
The Different Types of Pyrography Tools
There are two main types of pyrography tools: solid-point and wire-point. Solid-point tools are heated by plugging them into an electrical outlet, while wire-point tools are heated by running a current through a wire. The voltage and running speed of the tool can differ between the two types, which can affect the quality and smoothness of the lines produced.
The Materials Used in Pyrography
Pyrography can be done on a variety of materials, including wood, leather, metal, and even some types of plastic. The type of material used can affect the quality of the final product, as well as the techniques and methods used to create it. Some materials may require a higher or lower voltage to produce the desired effect, while others may contain fine particles that can be released during the burning process, making safety essential.
The Role of Technique in Pyrography
Technique plays a crucial role in producing high-quality pyrography designs. Beginners should start with simple designs and basic techniques, such as controlling the tool’s temperature and speed, before moving on to more advanced methods. Advanced users may use different techniques to create certain shapes or styles, such as tight lines or smoother curves.
The Importance of Safety in Pyrography
Safety is essential when working with pyrography tools. Fine particles can be released during the burning process, so it is advised to work in a well-ventilated area and wear a mask to prevent inhaling them. It is also important to choose the correct tool for the job, as using a tool with too much power can be dangerous.
The Popularity of Pyrography
Pyrography has become a popular hobby for many people today, with a wide range of tools and materials available to choose from. It is a great way to create unique and personalized designs on wood, leather, and other materials. With a little research and practice, anyone can produce great quality designs using the art of pyrography.
The Fiery Origins of Pyrography
Pyrography, also known as pokerwork or wood burning, is a traditional art form that dates back to the early days of human civilization. The origins of pyrography can be traced back to the cavemen who used fire to create marks on tawny surfaces. The remains of charred wood found in parts of prehistoric China certainly suggest that humans have been practicing this art form for a very long time.
The Han Dynasty and the Invention of Pyrography
The earliest known form of pyrography can be traced back to the Han Dynasty in China, circa 200 BC. The Chinese used a needle to burn intricate designs into wood and other materials. This process was known as “fire needle embroidery” or “han pyrography.”
Victorian Era and the Coined Term Pyrography
Pyrography became a popular practice during the Victorian era. The invention of the pyrographic tool sparked widespread interest in the art form. The term “pyrography” was coined in the late 1800s by a pyrographer named Robert. The practice of pyrography became a small product industry, with vintage pyrographic pieces still being highly sought after today.
Modern Pyrography and Contemporary Pyrographers
Today, pyrography is widely applied to wood, leather, and other materials. The process of pyrography involves using a heated tool to burn designs into the surface of the material. Pyrographers prepare their work by sketching the design onto the surface before using the tool to create the final product.
Contemporary pyrographers like Tawny Davide and Della Noce continue to push the boundaries of the art form, creating beautiful and intricate designs that showcase the versatility of pyrography. The process of pyrography remains a popular and timeless practice, with its origins traced back to the earliest days of human history.
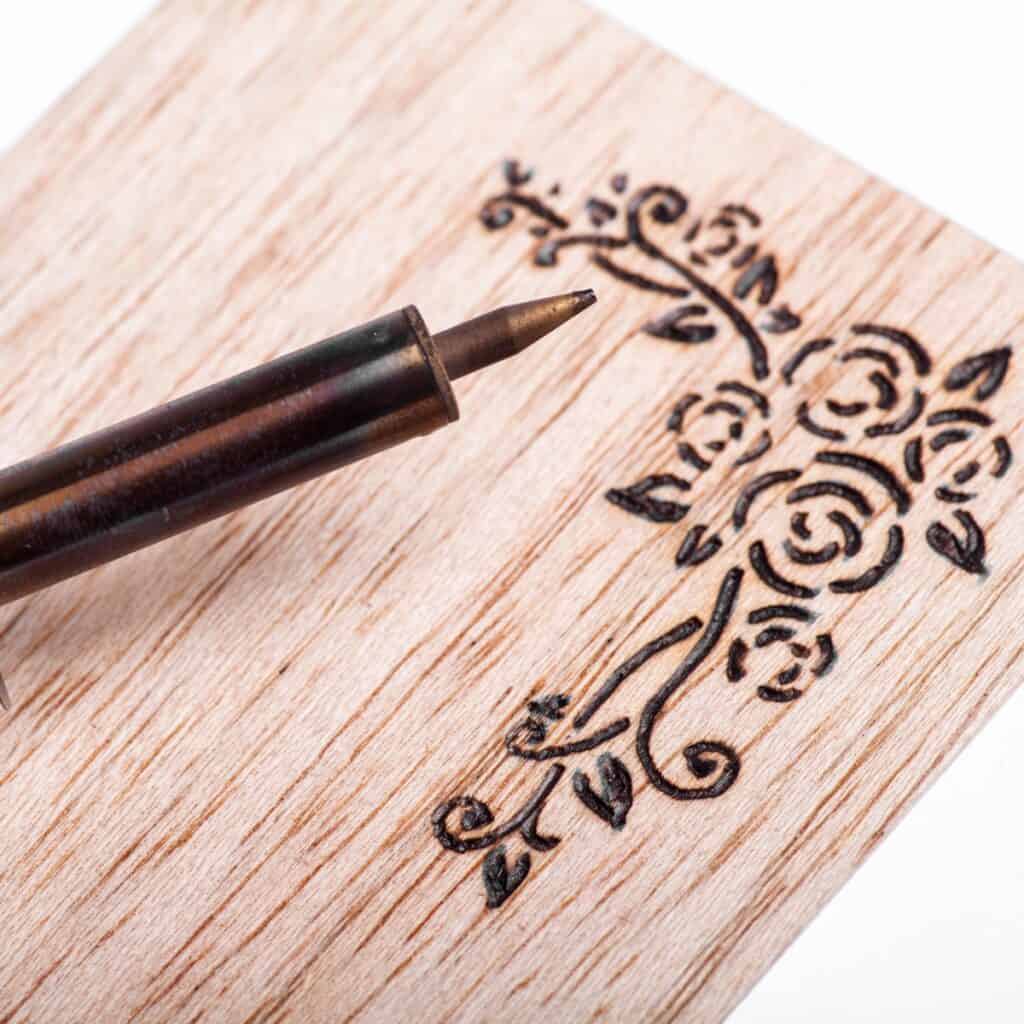
Pyrography on Wood: Tips, Techniques, and Safety
When it comes to pyrography, not all types of wood are created equal. Some types of wood are easier to work with than others, while some produce better results. Here are some things to consider when choosing the right wood for your pyrography project:
- Softwoods like pine, cedar, and basswood are great for beginners as they are easy to burn and have a nice, smooth grain.
- Hardwoods like oak, maple, and cherry are typically harder to burn but produce a finer, more detailed result.
- Make sure the wood is dry and free of any moisture to prevent warping or cracking.
- Avoid using pressure-treated or chemically-treated wood as they can release harmful particles when burned.
- Choose a piece of wood with a nice, smooth surface to make burning easier and more comfortable.
Tools and Techniques for Wood Pyrography
Once you have your wood selected, it’s time to start burning! Here are some tips and techniques to help you achieve the perfect pyrography design:
- Use a high-quality pyrography pen or tool with a temperature control switch to ensure the correct heat level for your project.
- Practice on a test piece of wood before starting on your final item to get a feel for the tool and the heat level needed.
- Follow the grain of the wood to achieve a natural and realistic look.
- Use a light hand and be careful not to press too hard, as this can cause the wood to burn too deeply and affect the resulting colour.
- Switch to a cooler pen tip or stand the pen in cool water to prevent it from getting too hot and burning the wood too quickly.
- Clean the pen tip regularly with a cloth to remove any ash or particles that could affect the quality of your work.
Design Ideas for Wood Pyrography
Pyrography on wood is a popular and simple way to create unique and custom designs. Here are some design ideas to get you started:
- Nature scenes like trees, leaves, and animals are a great choice for wood pyrography and can be easily adapted to any skill level.
- Custom designs like names, quotes, or logos can add a personal touch to any item.
- Cutting boards, bowls, and other kitchen items are a popular choice for pyrography and make great gifts.
- Darker woods like walnut or mahogany can produce a nice contrast with lighter burn marks.
- Follow pyrography artists on social media for inspiration and new ideas.
Safety Precautions for Wood Pyrography
As with any art form, safety is essential when it comes to pyrography on wood. Here are some safety precautions to keep in mind:
- Always work in a well-ventilated area to prevent inhaling harmful particles.
- Use a mask or respirator to protect your lungs from any particles released during burning.
- Keep a fire extinguisher nearby in case of any accidents.
- Never leave a hot pyrography pen unattended.
- Take breaks often to avoid eye strain and hand fatigue.
- Let the pen cool down completely before storing it away.
Leather: A New Level of Pyrography
When it comes to pyrography on leather, the tools and materials needed are similar to those used for woodburning. However, there are a few differences to keep in mind:
- Use a leather-specific burner, as the temperature and tip design will be different compared to a woodburning tool.
- Choose a thin and smooth piece of leather to work on, as a rough surface can make it difficult to create straight lines and intricate designs.
- A light-colored leather will allow for a darker burn mark, while a dark leather will produce a lighter mark.
- A glove can protect your hand from the heat and allow for better control over the tool.
- An awl can be used for tracing designs onto the leather surface before burning.
Technique and Tips
Pyrography on leather requires a bit more skill and practice compared to woodburning. Here are some tips to help you get started:
- Start with a proper design and trace it onto the leather surface using an awl or light pencil mark.
- Practice on a scrap piece of leather before working on your final project.
- Keep the burner at a lower temperature to avoid burning through the leather.
- Use a light touch and avoid scratching the surface with the tip of the burner.
- Work in a well-ventilated area to avoid inhaling any fumes released during the burning process.
- Cover any areas of the leather you don’t want to burn with glue or tape to protect them.
- Depending on the design, it may be easier to work in sections rather than trying to burn the entire design at once.
- Straight lines can be created by using a ruler or other straight edge as a guide.
- Test the temperature of the burner on a scrap piece of leather before starting your project.
- If you make a mistake, use an awl or light sandpaper to remove the burn mark and start again.
Projects and Inspiration
Leather pyrography offers a unique and natural material to work with, and there are many different projects and designs you can create. Here are some ideas to get you started:
- Personalized leather keychains or bracelets with initials or names burned into them.
- Custom leather coasters with intricate designs.
- Pyrography on leather postcards or Christmas cards to send to friends and family.
- Leather patches with designs burned into them to sew onto jackets or bags.
- Bigfoot-inspired designs on leather patches or wallets, inspired by the work of artist Jan Miller and her friend who began making Bigfoot-themed leather products.
- Winter-themed designs on leather gloves or hats.
Where to Find Information and Products
If you’re interested in trying out leather pyrography, there are many resources available online:
- PyrographyOnline.com offers tips, tricks, and tutorials specifically for leather pyrography.
- LeathercraftTools.com offers a variety of leather-specific burners and tools for sale.
- Leather stores and craft stores may also carry leather and leatherworking tools.
- Inquiries can be made to pyrography artists who specialize in leatherwork for extra tips and advice.
The Tools of the Trade: Pyrography Equipment
Pyrography tools have come a long way since their traditional methods, and the modern market offers a range of options to choose from. Some of the main features of modern pyrography tools include:
- Electric power sources: These allow for faster and more efficient burning, making the process of pyrography much easier and quicker.
- Different tip types: Modern pyrography tools offer a range of tip types, allowing for more specific designs to be created.
- Safer construction: Modern pyrography tools are inherently safer than traditional methods, as they do not require wet materials or open flames.
Examples of modern pyrography tools include the Razertip Dual Burner, the Colwood Super Pro II, and the Burnmaster Eagle. When choosing a pyrography tool, it is important to consider the type of material you will be working with, the type of design you want to create, and your level of experience.
Mastering Pyrography: Tips and Tricks for Woodburning
When it comes to pyrography, the right tool can make all the difference. Here are some tips for choosing the right burner and tip for your project:
- Consider the type of wood you’ll be working with. Softer woods, like pine, require lower heat and smaller tips, while harder woods, like oak, require higher heat and larger tips.
- Choose a burner with adjustable heat settings. This will allow you to control the temperature and prevent scorching or burning your wood.
- Invest in a set of different tips. Different tips can create different effects, such as fine lines or shading.
- Use a handpiece that feels comfortable in your hand and has a good weight distribution. This will help prevent hand fatigue during longer projects.
Preparing Your Wood
Before you start burning, it’s important to prepare your wood properly. Here are some tips:
- Sand your wood to a smooth finish. This will help prevent the tip from catching on rough spots and ruining your project.
- Wipe your wood with a damp cloth to remove any dust or debris. This will help prevent the tip from clogging with debris.
- Use a pencil to lightly sketch your design onto the wood. This will give you a guide to follow while burning.
Burning Techniques
Now that you’re ready to start burning, here are some tips for getting the best results:
- Start with a low heat setting and gradually increase it as needed. This will help prevent scorching or burning your wood.
- Use a light touch when burning. Pressing too hard can cause the tip to catch and create unwanted marks.
- Work in a well-ventilated area to avoid inhaling fumes.
- Use pliers or tweezers to change tips or adjust the burner. This will prevent you from burning your fingers.
- If you need to create a hole or spot, use a fine tip and work slowly. It’s easier to add more burn than to try to fix a mistake.
Safety Tips
Pyrography can be a fun and rewarding hobby, but it’s important to practice safety. Here are some tips:
- Always use a heat-resistant surface to place your burner on when not in use.
- Never leave your burner unattended while it’s on.
- Use caution when handling hot tips or burners.
- Keep a fire extinguisher nearby just in case.
- If you’re unsure about a certain technique or tool, do some research or ask for guidance before attempting it.
Pyrography: Answering Your Burning Questions
Pyrography is a versatile medium that covers a wide range of forms and techniques. Some of the primary forms include:
- Woodburning: burning designs onto wood
- Leather burning: burning designs onto leather
- Paper burning: burning designs onto paper
- Gourd burning: burning designs onto gourds
- Pyrography painting: using pyrography to add shading and texture to a painting
What are the essential materials and tools needed to start pyrography?
To start with pyrography, you will need the following:
- Pyrography pen or tool
- Wood or other material to burn on
- Sandpaper or other materials to smooth the surface
- Design or pattern to follow
- Mask (recommended) to avoid inhaling toxic smoke
What are some tips for beginners who want to start pyrography?
If you’re a beginner looking to start pyrography, here are some tips to keep in mind:
- Start with a basic pyrography tool and wood to get a feel for the medium.
- Choose a specific design or pattern to follow to make it easier to learn.
- Add shading and texture to your work to make it more interesting.
- Practice your skills regularly to improve and perfect your technique.
- Wear a mask to avoid inhaling toxic smoke.
What are some common mistakes beginners make in pyrography?
Some common mistakes beginners make in pyrography include:
- Not choosing the right pyrography tool for the job
- Not sanding the surface of the wood or material before starting
- Not wearing a mask to avoid inhaling toxic smoke
- Not practicing enough to improve their skills
- Not taking breaks to avoid burning out
What is the difference between pyrography and woodburning?
Pyrography and woodburning are essentially the same concept. Pyrography is the art of burning designs onto any material, while woodburning is specifically burning designs onto wood. In the United States, the terms are often used interchangeably.
What are some pros of using pyrography as a medium?
Some pros of using pyrography as a medium include:
- It is a fairly easy and basic medium to learn.
- The materials and tools needed are readily available and affordable.
- There are numerous examples and techniques available for beginners to learn from.
- It is a safer form of art compared to other mediums like painting or sculpting.
- It allows for a wide range of designs and styles to be created.
Conclusion
So there you have it- everything you need to know about pyrography. It’s a great hobby for anyone who’s interested in art and likes to burn things.
You can use pyrography to create just about anything, from simple designs to intricate works of art. It’s a great way to express yourself and enjoy some quality time with a hobby you can enjoy for a lifetime.
Also read: a soldering iron vs a wood burning tool for pyrography

I'm Joost Nusselder, the founder of Tools Doctor, content marketer, and dad. I love trying out new equipment, and together with my team I've been creating in-depth blog articles since 2016 to help loyal readers with tools & crafting tips.