So you want to build something with wood. However, the wood pieces may not fit together perfectly due to the fact that wood is not a uniform material.
Joints are the points where two or more pieces of wood are connected. There are many different types of joints, each with their own strengths and weaknesses, ranging from simple butt joints to complex dovetail joints.
In this article, I’ll explain what joints are and how to use them in your DIY projects.
In this post we'll cover:
- Get a Grip: Understanding Joints in DIY Projects
- Why Joining Wood Pieces is Key in DIY Projects
- The Basics of Butt Joint and Mitered Joint in Woodworking
- Getting to Know the Rabbet Joint: A Great Addition to Your Woodworking Skills
- How to Perform a Scarf Joint in Woodworking and Metalworking
- The Versatility of Tongue-and-Groove Joints in DIY Projects
- The Art of Dovetailing: Creating Strong and Beautiful Joints
- Box Joint: A Decorative and Practical Joint for Woodworking Projects
- Mastering the Half-Lap Joint: Creating a Strong and Smooth Connection
- The Pocket Joint: A Strong and Versatile Technique for DIY Projects
- Get to Know the Dado Joint: A Great Way to Build Cabinets and Bookshelves
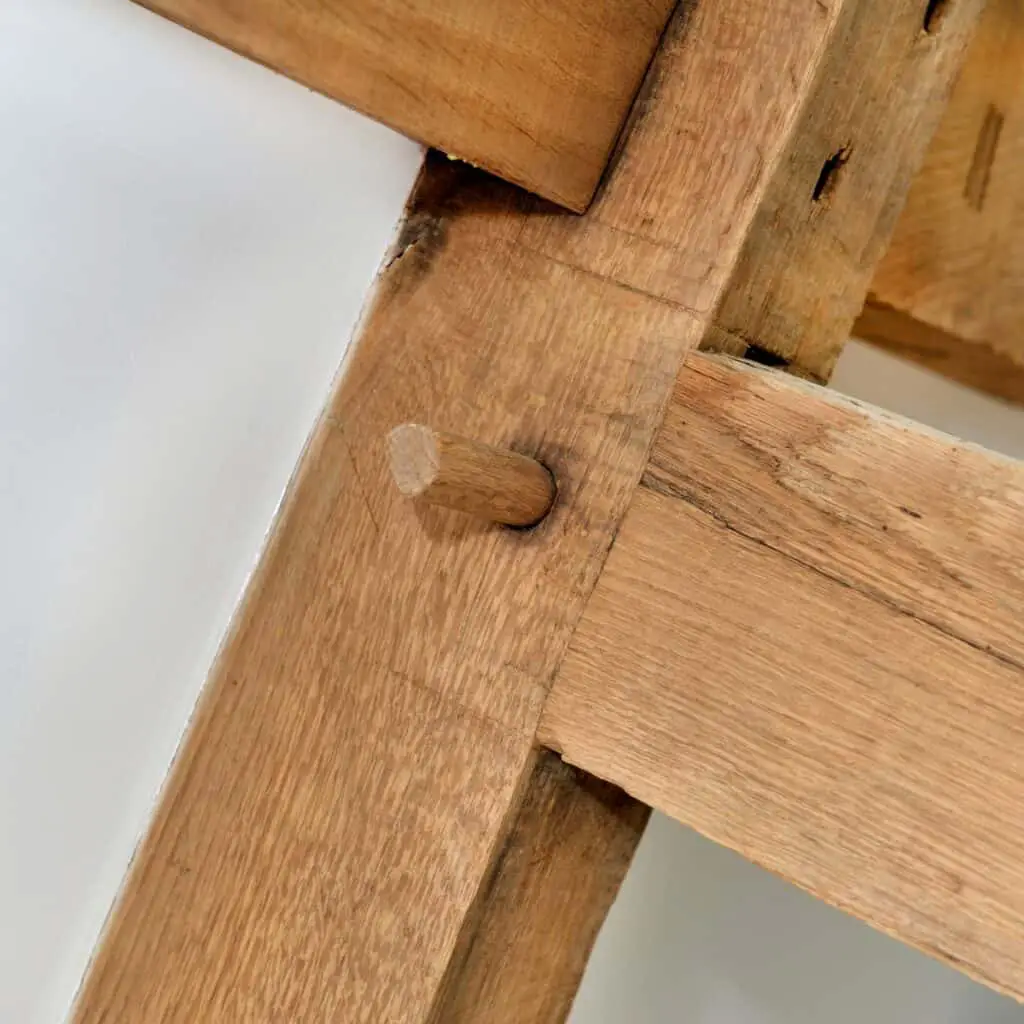
- The Mortise and Tenon Joint: A Strong and Solid Woodworking Technique
- Get Your Woodworking Game Strong with Bridle Joints
- The Biscuit Joint: A Quick and Easy Way to Connect Your DIY Projects
- Conclusion
Get a Grip: Understanding Joints in DIY Projects
Joints are important for several reasons, including:
- Structural Integrity: Joints lend structural integrity to a project, making it stronger and more secure.
- Customization: Joints allow for customized connections between pieces of wood, making it possible to create unique and personalized projects.
- Traditional Joinery: Joints are a traditional and time-tested way to connect pieces of wood, and they are still relied upon by experienced DIYers and veterans of the craft.
Types of Joints
There are dozens of different types of joints, each with its own strengths and weaknesses. Here are some of the most common types of joints:
- Butt Joint: A basic joint that involves simply cutting two pieces of wood to size and joining them together.
- Mortise and Tenon Joint: A strong and secure joint that involves cutting a slot (mortise) into one piece of wood and a protrusion (tenon) on the other piece that fits snugly into the slot.
- Dovetail Joint: A super-strong joint that involves interlocking slots and protrusions that are cut into the pieces of wood.
- Half-Lap Joint: A simple joint that involves cutting a slot halfway through each piece of wood and joining them together.
- Pocket Joint: A joint that involves drilling a hole at an angle into one piece of wood and joining it to another piece using a special bracket and screws.
- Biscuit Joint: A joint that involves cutting a small slot into each piece of wood and inserting a thin, oval-shaped piece of wood (called a biscuit) that is coated in adhesive.
- Dowel Joint: A joint that involves drilling holes into each piece of wood and inserting wooden dowels that are coated in adhesive.
How to Choose the Right Joint for Your Project
Choosing the right joint for your project depends on several factors, including:
- The type of wood you are working with
- The size and shape of the pieces you are connecting
- The level of experience you have with DIY projects
- The tools and hardware you have available
Here are some tips to help you choose the right joint for your project:
- Start with the basics: If you are a beginner, start with simple joints like the butt joint or half-lap joint.
- Consider the strength of the joint: If your project will be subjected to a lot of stress or movement, choose a stronger joint like the mortise and tenon joint or dovetail joint.
- Think about the hardware you have: If you don’t have a lot of hardware or tools, choose a joint that doesn’t involve a lot of external hardware, like the biscuit joint or dowel joint.
How to Test the Strength of Your Joints
It’s important to test the strength of your joints before relying on them in your project. Here are some tips for testing your joints:
- Feel for movement: If the joint feels loose or wobbly, it may not be strong enough for your project.
- Try to move the pieces of wood: If the joint moves or separates when you try to move the pieces of wood, it may not be strong enough for your project.
- Use a reasonable amount of force: Don’t be afraid to give your joint a little tug or push to see how it holds up, but don’t use excessive force that could damage your project.
Safety Tips for Working with Joints
Working with joints involves cutting and shaping pieces of wood, which can be dangerous if proper safety precautions are not taken. Here are some safety tips to keep in mind:
- Always wear safety glasses (some top brands here) or goggles when cutting or shaping wood.
- Use sharp tools and blades to reduce the risk of injury.
- Keep your hands and fingers away from moving blades and cutters.
- Use clamps to secure your project while you work on it.
- Follow all manufacturer’s instructions when using adhesives and other chemicals.
Frequently Asked Questions About Joints
Here are some frequently asked questions about joints in DIY projects:
- What is the strongest type of joint? The dovetail joint is often considered the strongest type of joint because of its interlocking slots and protrusions.
- What is the weakest type of joint? The butt joint is often considered the weakest type of joint because it relies solely on glue or nails to hold the pieces of wood together.
- Can I use adhesive instead of hardware to connect pieces of wood? Yes, adhesive can be used to create strong and secure connections between pieces of wood, but it’s important to choose the right type of adhesive for your project.
- How long does it take for adhesive to dry? The drying time for adhesive depends on the type of adhesive and the conditions in which it is used. Always follow the manufacturer’s instructions for drying time.
- Can I create my own customized joints? Yes, with some experience and experimentation, it’s possible to create your own customized joints that are tailored to your specific project.
Why Joining Wood Pieces is Key in DIY Projects
When working with wood, you want to make sure that your pieces are attached in a way that won’t break easily. This is where joints come in handy. By using a variety of joints, you can create a super strong connection between two pieces of wood. Gluing boards together is good, but adding a joint is even better.
Speeding Up the Joining Process
Joining wood pieces with a joint is usually a quick and easy way to connect them. While traditional methods like using screws or metal connectors can work, they can also take a lot of time and effort. With joints, you can cut a few slots or use a power tool with the right blade and you’re good to go.
Creating a Variety of Shapes and Uses
Joints come in a wide variety of types, each with their own uses and shape. Whether you want a simple butt joint or a more complex dovetail joint, there’s a joint out there that’s perfect for your project. You can create a series of straight or angled joints, or even add a little extra flair with a box joint or biscuit joint. The possibilities are endless.
Helping Novice DIYers
If you’re new to the world of woodworking, joints can be a little intimidating at first. But don’t worry, even beginner DIYers can master the art of joining wood pieces. With a little practice and some know-how, you’ll be able to create solid and strong connections in no time.
Ensuring Proper Alignment and Tight Fits
One of the biggest benefits of using joints is that they ensure proper alignment and tight fits between wood pieces. This is especially important when working with wide or angled edges. Without a joint, it can be difficult to get the pieces to line up exactly right. But with a joint, you can be sure that everything is attached properly.
The Negative Side of Joints
While joints are a great way to connect wood pieces, there are some negatives to consider. For one, some joints can be difficult to make properly. Additionally, some joints require extra tools or techniques that novice DIYers may not be familiar with. And finally, some joints may not be as strong as others, so it’s important to pick the right joint for the job.
The Basics of Butt Joint and Mitered Joint in Woodworking
A butt joint is the simplest and most basic type of joint in woodworking. It involves joining two pieces of wood by simply placing them end to end and gluing or screwing them together. This type of joint is commonly used in building structures and furniture, as it is easy to make and requires minimal tools and materials. Here are some important things to keep in mind when making a butt joint:
- The joint is only as strong as the glue or screws used to hold it together.
- To ensure a proper fit, the two pieces of wood should be cut to the same length and have flat, square ends.
- Depending on the size of the pieces being joined, it may be necessary to use additional screws or pocket holes to provide extra holding power.
- For larger pieces, it may be necessary to use angled cuts or special techniques to prevent the joint from splitting or breaking under stress.
Which is Better: Butt Joint or Mitered Joint?
The answer to this question depends on a variety of factors, including the type of project you are working on, the materials you are using, and your personal preferences as a woodworker. Here are some things to consider when deciding between a butt joint and a mitered joint:
- Butt joints are generally considered to be stronger and more durable than mitered joints, as they provide a larger surface area for gluing or screwing the pieces together.
- Mitered joints are often used for decorative purposes, as they provide a clean, seamless look that is difficult to achieve with other types of joints.
- Butt joints are easier to make and require fewer tools and materials than mitered joints, making them a good choice for beginners or those on a tight budget.
- Mitered joints require precision cutting and careful measuring, which can be time-consuming and may require specialized tools or equipment.
- Ultimately, the best type of joint to use will depend on the specific needs of your project and your own personal preferences as a woodworker.
Getting to Know the Rabbet Joint: A Great Addition to Your Woodworking Skills
The rabbet joint is a great joint to use when you need to join two pieces of wood together at a right angle. It is commonly used in cabinet making, as it provides a strong and sturdy joint that can support the weight of heavy objects. The rabbet joint is also commonly used in kitchen construction, as it allows for the easy joining of different parts of the cabinet.
What are the Different Types of Rabbet Joints?
There are several different types of rabbet joints, each with its own features and uses. Here are some of the most common types:
- Straight Rabbet Joint: This is the most basic type of rabbet joint, where the groove is cut straight into the wood.
- Rebate Joint: This joint involves cutting a rabbet on both sides of the wood, creating a wider channel.
- Dado Joint: This joint is similar to the rabbet joint, but it is cut across the grain of the wood.
- Offset Rabbet Joint: This joint involves cutting the rabbet at an angle, creating a wider channel on one side of the wood.
What Tools Do You Need to Make a Rabbet Joint?
To make a rabbet joint, you will need the following tools:
- Saw or router
- Rabbeting bit
- Router table or handheld router
- Bearing guide
- Clamps
- Glue or screws
How to Perform a Scarf Joint in Woodworking and Metalworking
To create a scarf joint, you will need the following tools:
- A saw or cutting tool
- A clamp or clamps
- Glue
- A spreading tool
Here are the steps to follow:
- First, determine the size and angle of the scarf joint needed for your project. This will depend on the material and the design of the project.
- Next, cut the material at an angle to create two strips with angled ends. The angle should be the same on both strips.
- Set the strips aside and prepare the blank for the joint. This is the actual piece of material that will be used in the project.
- Remove any rough edges or bumps from the blank to ensure a good fit.
- Align the strips with the blank to ensure a perfect fit.
- Apply glue to the angled ends of the strips and spread it evenly with a spreading tool.
- Attach the strips to the blank and apply pressure with clamps to hold them in place.
- Allow the joint to fully dry before removing the clamps.
The Benefits of a Scarf Joint
There are several benefits to using a scarf joint in woodworking and metalworking:
- It provides excellent holding power, which helps prevent the joint from separating over time.
- It is a simple and easy process to follow, even for beginners.
- It is a good way to join thicker pieces of material that may be difficult to align and clamp with other joints.
- It is an accurate way to shape the material to the desired size and angle.
- It is a versatile joint that can be used in a vast array of designs and custom projects.
The Versatility of Tongue-and-Groove Joints in DIY Projects
Tongue-and-groove joints are a type of edge joint that utilizes a mechanical interlock to connect two pieces of wood. The edge of one board has a groove, while the mating board has a matching tongue that fits into the groove. This joint is commonly used in DIY projects, especially in creating solid wood panels, table tops, and other flat surfaces. The tongue-and-groove joint is designed to produce a tight, smooth, and seamless connection between two boards, leaving no gaps or tension between the pieces.
The Different Types of Tongue-and-Groove Joints
There are two main types of tongue-and-groove joints: the traditional tongue-and-groove joint and the slip tongue joint. The traditional tongue-and-groove joint is the most common and is used to connect two boards of the same size. The slip tongue joint, on the other hand, is used to connect two boards of different sizes. It involves cutting a smaller tongue on one board and a groove on the other board that is slightly larger than the tongue. The slip tongue is then placed in the groove, creating a tight and extended connection between the two boards.
The Art of Dovetailing: Creating Strong and Beautiful Joints
Making a dovetail joint requires a bit of skill and patience, but with the right tools and technique, it can be done. Here’s a step-by-step guide on how to make a dovetail joint:
- Start by marking the depth of the tails on the tail board using a marking gauge.
- Use a dovetail jig to guide your cuts or mark the tails by hand using a marking knife and chisel.
- Once you’ve reached the front of the board, flip it over and continue cutting from the other side.
- Clean up the board with a chisel and ensure that the tails are straight and even.
- Measure and mark the pin board with a marking gauge and trace the tails onto the board.
- Cut the pins using a dovetail saw (we’ve reviewed the best ones here) or a router with a dovetail bit.
- Clean up the pins with a chisel and ensure that they match the tails perfectly.
- Place the pin board into the tail board and admire your work!
Choosing the Right Dovetail Jig
If you’re new to dovetailing or need to make a large number of joints, a dovetail jig can be a helpful tool. Here are some things to consider when choosing a dovetail jig:
- Base and Sides: Look for a jig with a solid base and sides to ensure stability during use.
- Depth and Width: Consider the depth and width of the boards you’ll be using to determine the size of the jig you need.
- Matching: Look for a jig that allows for matching of the tails and pins for a seamless joint.
Learning how to make a dovetail joint takes time and practice, but the end result is a strong and beautiful joint that will last for years to come.
Box Joint: A Decorative and Practical Joint for Woodworking Projects
Box joints have grown in popularity in recent years due to their simplicity and ease of construction. They are a preferred joint for nearly any wooden container or box, as they provide a good amount of strength and a tight fit. They are also an excellent alternative to standard joints, as they allow for custom patterns and tighter connections.
What are the Practical Applications of Box Joint?
Box joints have a lot of practical applications in woodworking. They are commonly used to construct wooden boxes, jewelry containers, and other small wooden projects. They are also used in the production of larger items, such as cabinets and furniture. Box joints are a popular joint for shipping containers, as they provide a strong and attractive joint that can withstand the rigors of shipping.
Where to Buy a Box Joint Jig?
Box joint jigs can be bought from a variety of companies, including Harbor Freight and other woodworking tool suppliers. They can also be built at home using a Forstner bit and some wooden scraps.
Mastering the Half-Lap Joint: Creating a Strong and Smooth Connection
There are several reasons why a half-lap joint may be the best choice for your project:
- It creates a strong and solid connection between two pieces of wood.
- The joint is relatively easy to cut and can be done with basic tools.
- It allows for a clean and smooth finish on the outside of the joint.
- It adds additional structure to the internal design of your project.
How to Cut a Half-Lap Joint
Cutting a half-lap joint involves a few steps to ensure a precise and correct fit:
- Measure the thickness of the piece of wood you are working with and mark the halfway point on both edges.
- Set your saw blade to the correct height and make a series of cuts along the marked line, being careful not to damage the outside edges of the wood.
- Carefully remove the material between the cuts with a chisel or other cutting tool.
- Repeat the process on the second piece of wood to create a matching joint.
- Connect the two pieces of wood by fitting the joints together and adding screws or other fasteners if necessary.
Tips for Creating a Quality Half-Lap Joint
To ensure the best possible half-lap joint, keep these tips in mind:
- Use sharp tools to make clean cuts and avoid damaging the wood.
- Be precise in your measurements and cutting to ensure a correct fit.
- Choose the right type of joint for your project and the materials you are working with.
- Take your time and work carefully to avoid mistakes that could cause damage or require starting over.
- Properly maintain your tools to ensure they are in the best condition for cutting.
Remember, creating a half-lap joint may take a little extra time and effort, but the end result will be a strong and smooth connection that adds quality and durability to your woodworking project.
The Pocket Joint: A Strong and Versatile Technique for DIY Projects
To create strong and durable pocket joints, it’s important to follow proper techniques for assembling them, including:
- Using the right size pocket hole jig (best ones reviewed here) for your project
- Choosing the right screws for your project
- Clamping the pieces of wood together tightly before screwing them together
- Using wood glue in addition to screws for added strength
Using Pocket Joints in DIY Furniture Projects
Pocket joints are a popular choice for building DIY furniture projects, including:
- Cabinets
- Ceramic tile conservation
- Economy saving home decor
- Bath moulding
- Original painting pet gates
- Photos planning
- Plumbing pop
- Recycling renovation
- Repurposing panels
- Sustainable technology
- Air replacing stair runner
Get to Know the Dado Joint: A Great Way to Build Cabinets and Bookshelves
To create a dado joint, you will need the following tools:
- Table saw (best ones here) or router
- Dado blade or bit
- Straightedge or jig to guide the cut
- Clamps to hold the workpiece in place
Additional tools that may be helpful include:
- Chippers to adjust the width of the cut
- Combination planes or files to clean up the edges of the cut
- Tapered straightedges to establish the remaining depth of the cut
- Freehand tools for receiving grooves
Notes on Dado Joint Terminology
- The term “dado” can refer to both the joint and the channel that is cut to create it.
- In some regions, the term “groove” is used instead of “dado.”
- The width of the dado joint varies depending on the thickness of the material being connected.
- The number of passes needed to create the initial channel will depend on the width of the blade or bit being used.
- The depth of the dado joint is typically determined by the thickness of the mating workpiece.
- Woodworkers may stack multiple workpieces to create a sandwiched dado joint.
- The use of a jig or straightedge is common to ensure a straight and level cut.
- A pro tip for resetting the saw or router to make multiple cuts at the same depth is to use a piece of scrap material as a guide.
The Mortise and Tenon Joint: A Strong and Solid Woodworking Technique
The mortise and tenon joint is a classic woodworking technique that involves inserting one end of a piece of wood into a hole in another piece of wood. This joint is ideal for making strong and solid pieces of furniture and other woodworking projects.
Tips for Creating a Strong Mortise and Tenon Joint
To ensure that your mortise and tenon joint is strong and solid, keep these tips in mind:
- Make sure the mortise and tenon are the same width and depth.
- Use a clamp to hold the two pieces of wood together while you work on the joint.
- Square off the walls of the mortise with a chisel to ensure a tight fit.
- Use a plunge router or a mortising router to create a clean and precise mortise.
Get Your Woodworking Game Strong with Bridle Joints
The bridle joint is a great joint to use for woodworking projects for the following reasons:
- It is a strong joint that can resist a lot of force.
- It is easy to make and requires only a few steps.
- It allows for a greater glue surface area, making it stronger than other joints.
- It is a good choice for larger pieces of wood that need to be joined together.
- It is ideal for creating frames, tables, and box structures.
What are the Tips for Making a Perfect Bridle Joint?
Making a perfect bridle joint requires careful attention to detail and precision. Here are some tips to help you make a perfect bridle joint:
- Measure and mark the pieces of wood carefully to ensure that the joint is in the correct position.
- Use a sharp saw blade to make the cuts, and make sure that the cuts are straight and clean.
- Test the fit of the joint before applying glue to ensure that it is correct.
- Clamp the pieces of wood together tightly to ensure that the joint is strong.
- Check the angle of the joint to ensure that it is correct.
- Use the correct type of material for the joint to ensure that it will resist any possible stress or force that may be applied.
The Biscuit Joint: A Quick and Easy Way to Connect Your DIY Projects
Biscuit joints have several advantages over other types of joints:
- They are quick and easy to make.
- They are strong and durable.
- They can be used to join pieces of wood of different sizes and thicknesses.
- They are suitable for a wide range of building projects, from smaller DIY projects to heavy-duty furniture.
- They can be used to join pieces of wood with different grain patterns.
Mastering the Biscuit Joint
Like any skill, mastering the biscuit joint takes practice. Here are some tips for getting started:
- Practice making biscuit joints on scrap pieces of wood before putting them to use in a project.
- Check the alignment of the joint before gluing it together.
- Use a dial to set the biscuit joiner to the correct depth for the size of biscuit you are using.
- Remove any excess glue from the joint before it dries.
- Use a sharp blade to make clean cuts in the wood.
Conclusion
So, joints are the way to connect pieces of wood together to make a stronger project. You should use the right joint for the right project and consider the strength, size, and shape of the pieces of wood.
Also, don’t be afraid to experiment with joints and use the right tools and adhesives for the job. You can make a stronger project with joints. So, go ahead and try them out!

I'm Joost Nusselder, the founder of Tools Doctor, content marketer, and dad. I love trying out new equipment, and together with my team I've been creating in-depth blog articles since 2016 to help loyal readers with tools & crafting tips.