Plasterer quote
Do you want to outsource plastering, plastering or plastering work to a professional? Finish your home nicely by having walls and ceilings plastered, plastered or plastered.
If you do not want to pay too much for the costs of a plasterer, you can request a free and non-binding quote here.
This way you will find the right professional in your area within a few moments, without any obligations! Good luck finding a plasterer. Want to see an example of a quote?
Plasterer what is that?
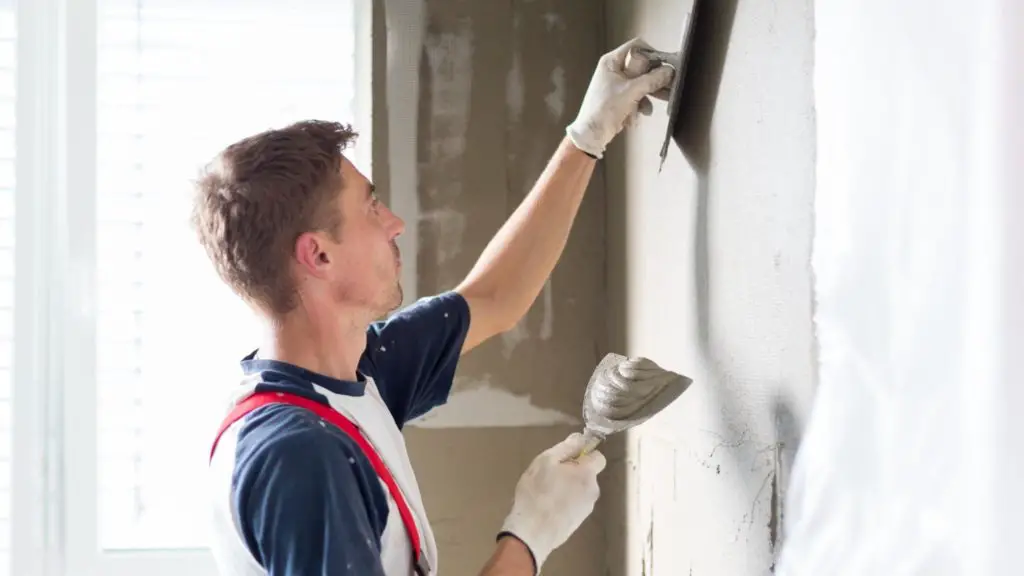
A plasterer at work
A plasterer is a person who prepares your walls and ceilings to be able to paint or apply wallpaper afterwards. To become a plasterer, you have to undergo training. Plastering can be learned through the so-called BBL. This is the vocational track. The beauty of this system is that you learn theory at school and the rest in practice. Often you work 4 days a week as an apprentice plasterer and 1 day you go to school. So you earn right and you learn. Such training lasts at least two years. If you pass, you will receive a diploma. You also need a diploma assistant construction and infrastructure and some supporting documents designated by the ministry. When you have accomplished this, you can call yourself a full-fledged plasterer. Of course there is also the possibility to take a crash course in plastering. This can be done through a home course. Then a plasterer becomes do it yourself. A plasterer is actually someone with whom you immediately see the end result. Smoothly finished walls and ceilings are the result of a plasterer/plasterer. A plasterer determines the image of a house both inside and out. He’s the one you’re looking at: smooth walls, smooth ceilings. He also adds structure to the walls. This can be in the form of decorative plaster or spac spraying. A good plasterer masters the profession on all fronts and has an excellent result.
Meaning plasterer
When a house is being built, you often see the walls unfinished on the inside. That means that you can still see the inner stones. In a bathroom, walls are made smooth because tiles are added later. But you don’t want to look at those stones in your other rooms. Or you have to give special preference to that. In most cases, clients want a smooth finished wall. The wall can be finished with cement or plaster. The cement is applied by hand and is impact-resistant stucco. Plaster is applied by hand or by machine. The difference lies in the hardness of the material. When the walls are delivered smooth, you can then apply different types of wallpaper: paper wallpaper, non-woven wallpaper or glass fabric wallpaper. The latter wallpaper can be painted over in all kinds of colours. If you don’t want this, you can stucco the sauce and apply a latex. You can also apply smooth stucco in color. Then you immediately have the end result in your favorite color.
Plasterer costs
Of course you want to know what a plasterer costs. You can try it yourself, but it requires skill. If you have a small piece of wall you could try it with alabastine smooth. It is a simple product with a clear description. But for complete walls and ceilings it is better to hire a plasterer. In addition to his craftsmanship, you also have a guarantee on the piecework. When you need a plasterer how do you find one. This can be done in 2 ways. You can ask your family or your acquaintances if they know of a plasterer who understands his craftsmanship. If that is the case, you are immediately sure that everything will be fine. Word of mouth is the best there is. If you cannot find a plasterer along this road, you can search the internet for a professional in your area. Important matters will then be discussed. Firstly, screen the company for Chamber of Commerce and name and address details. If they are correct, you can read references and possibly ask for photos of the work delivered before. The photos must then have a reference to that customer where you can inquire. Otherwise it makes no sense. If the data is correct, you can already compare an hourly wage for plasterer. This is already a benchmark to start with. Now the hourly wages will not differ much from each other. But the bottom line is that not all plasterers do the same thing. So actually this is not a measuring instrument to compare. And then it also differs per region. Plasterer cost per m2 is a much better tool to compare. It is actually an overall picture: how much review does he have, what is his price per m2, how is he independent, can you call references. These are all things that are important in a decision. When you invite 3 plasterers for an interview, you have enough comparison material: does he come to his appointment on time, is there a click, how does he come across, does he create clarity, does he take time for you and so on. Those are the ingredients for a
final decision. So it’s not always a price. It’s a combination of factors.
Prices plasterers 2018:
work avg. price in m2 – all-in
Stucco ceiling €5 – €25
Stucco wallpaper ready € 8 – € 15
Stucco sauce ready € 9 – € 23
Spack spraying € 5- € 1
Decorative plaster € 12 – € 23
Would you like to outsource the work and receive quotes from 6 plasterers in your region without any obligation? Please request quotes using the quote form above.
These are prices all inclusive. This includes labour, material and VAT.
Do it yourself
Are you a do-it-yourselfer or do you want to save money by doing the stucco yourself? Painting Fun will help you on your way.
If you are dealing with small surfaces, read this article: https://www.schilderpret.nl/alabastine-muurglad/
Plastering supplies
Electric Mixing Machine
White Specietub
Appropriate clothing and safety shoes
Sturdy stairs or ladder or room scaffolding
Trowels: piece trowel, corner trowel, tire trowel, plaster trowels
Plaster trowel, plaster trowel
Barn board, Turnip board
Spack knives, plaster knives, putty knives, plaster knives, snap-off knives
concrete cutter
Abrasive mesh 180 and 220
plaster ax hammer
scouring sponge fine
Level
knee pads
corner protectors
Plaster row or reilat
paling iron
Gloves
Brush
all-purpose cleaner
Stucloper
Masking film, masking paper, Duck tape, masking tape
Step-by-step plan for smoothing the wall:
Empty space
Cover the floor with plaster and stick the edge with Duct tape
Tape adjacent walls with foil
Remove wallpaper and make the wall dust-free and clean with an all-purpose cleaner
Prime the wall with a primer or adhesive primer (depends on the substrate: absorbent = primer, non absorbent = adhesion primer) Tip: You can test this by holding a wet cloth against the wall: dry the spot quickly then it is a absorbent wall)
Making plaster in white mortar tub
Stir well with a mixing machine (drill with whisk)
Put plaster on a turnip board with a plaster trowel
Apply the plaster to the wall with a plaster trowel at an angle of 45 degrees and lift it diagonally to finish the entire wall
Level the wall with a plaster row or rail and remove excess plaster
Fill holes with plaster with a plaster trowel
Remove the excess plaster again with a straight edge
Wait about 20 to 30 minutes and run your fingers over the stucco: if you stick it, use a knife
Take an angle of 45 degrees and take a spatula and level the stucco from top to bottom
Take a flower spray and wet the wall
Then go sponge with a rotating movement
This creates a slip layer
You can then remove that sludge layer with a spackle knife
Do this until the entire wall is smooth
When the wall is completely dry and appears white you can start sauce or paste wallpaper
Prime the wall again before you start sauce or paste wallpaper.
How does a plasterer work
A plasterer has a certain method. When viewing the proposed stucco, the plasterer will first need to know which walls or ceilings are involved. Then he can record the square meters and use that to quote a price. He will then immediately show you some examples of stucco. After a calculation, he will give a price and if he agrees, he will get to work. In order to deliver smooth stucco, he must first make some preparations. The space to be plastered will first have to be completely cleared. If this is the case, the floor is covered with a stucco runner. A plaster runner is on a roll and is 50 to 60 centimeters wide. The sides are glued with Duck tape. Remove electrical outlets and turn off the power. Then the adjacent walls are taped with masking film. The foil is fixed by means of a tape. First, the wall is cleaned dust-free with an all-purpose cleaner. When the wall is dry, any large holes are first closed. This is done with quick plaster. The plaster dries within fifteen minutes. Protect the internal corners with corner protectors. These are made of aluminum. The thickness depends on the layer of stucco on the wall. Do this 4 hours in advance because of the drying. The wall must first be pretreated. The purpose of the pre-treatment is to create a bond between the wall and the adhesive. Apply the primer with a block brush. Allow the product to dry according to the specified drying time. Then he takes a white mortar tub and starts mixing the plaster with water by means of an electric mixing machine. First add the indicated water and then
fit the plaster. Always use a clean tub and mixer. The plasterer uses a white mortar tub because it does not bleed compared to a black mortar tub. It will take a few minutes to mix before it becomes a liquid paste. Then he takes a trowel and puts the plaster on a turnip board. The plaster is applied to the wall with a plaster trowel. Press the trowel lightly on the but, holding it slightly at an angle, and spread the plaster with a smooth motion. Start left if you are right handed and vice versa. You will see thickness differences but that is just bad. Immediately after applying the plaster, flatten the wall with a straightening lath. Keep the rail slightly skewed and start at the bottom and go up. The excess plaster remains on the rail. Repeat this several times until it is completely flat. So also from left to right and vice versa. Clean the rail in between with water for a better result. Thickness differences are equalized with a rail. Then fill the holes with the plaster and plaster. Then again with the rail over it. After about twenty minutes you can no longer press in the stucco. The wall can now be forged. Hold the spatula at a 45-degree angle to the surface and smooth out the plaster. Work from top to bottom. Spread the pressure with 2 fingers on the blade. This will close all holes and irregularities. After half an hour, feel with your fingers whether the stucco is still a bit sticky. If it still sticks somewhat, you can start sponging. Wet the sponge with cold water and start sanding the wall with a circular motion. This creates a slip layer that you can then use to plaster. This can be done after 10 to 15 minutes. Hold the spatula at an angle of thirty degrees to the surface and smooth out the sludge layer. After 20 or thirty minutes, moisten with a plant sprayer and then smooth it again with a spatula. This is also known as plastering. After this, the drying process begins. The rule of thumb is that 1 millimeter of stucco layer needs 1 day to dry. Make sure the room is well heated and ventilated. The wall is not dry until it has a white color. After this you can provide the wall with a wallpaper or start painting the wall.
Spac spraying
Spack spraying is nowadays often done in new construction. And especially the ceilings. The agent, which is called spack, consists of lime and synthetic resin and is applied by a special machine that is suitable for this purpose. The advantage of spack is that it is finished immediately. Spack is available in different thicknesses: fine, medium and coarse. In general, the middle grain is used. Doing plaster spraying yourself is not recommended because this requires some skill from a good plasterer.
Beforehand, the space is emptied and the floor is covered with a plaster runner. It is important that the plaster runner is stuck on the sides with Duck tape, to prevent shifts. Then all frames, windows, doors and other wooden parts are taped with a foil. Sockets must also be dismantled and the power there during the work.
Two coats are applied. The first coat is sprayed on the walls to level the walls. Immediately all holes and dimples have disappeared. The second layer contains granules that determine the structure and this is not knifed off but remains as the final result. The advantage of plastering is that you do not have to use a primer beforehand, but what is important is that the walls are smooth and flat. What you do need to pre-treat are any damp spots or places where there has been a lot of smoking. If you don’t do this, it can show through and that is a waste of your plaster spraying. If damage occurs to the work later on, you can repair your plaster spraying. Tubes are for sale in the various hardware stores. Alabastine has become known with spackrepair or spackspray. Both products can be painted over.
Spacking costs vary widely. The difference lies in the masking of the spaces. It depends on the number of frames, doors and windows. What also plays a role is whether it is a new home or an occupied home. The latter requires more masking. Prices range from €5 to €10 depending on the region. It is also possible to have spack executed in colors. A surcharge of € 1 to € 2 per m2 applies for this. The above prices are per m2 all-in.
Painting stucco? When the stucco has dried white, you can start painting it. If the work has been completed smooth, it must first be pre-ironed. This is for the bonding of wall and latex. Pre-tape the adjacent walls with tape and cover the floor with a plaster runner. When the primer has completely dried, latex can be applied. Because these are new walls, at least 2 layers must be applied if a light color. when
there is a dark color such as red, green, blue, brown, then you will have to apply three layers. Do you want to outsource painting? Click here for free quotes from local painters.
Do you have any questions or comments regarding this topic?

I'm Joost Nusselder, the founder of Tools Doctor, content marketer, and dad. I love trying out new equipment, and together with my team I've been creating in-depth blog articles since 2016 to help loyal readers with tools & crafting tips.