Table saws are a much-cherished tool in the wood crafting world, and nobody can deny that part. But when it’s about making a 45-degree angle cut, even the professionals might blunder.
Now, the question is, how to cut a 45-degree angle with a table saw?
Proper preparation is crucial for this task. The blade must be set to a suitable height, and you should outline appropriately. Using a tool like a miter gauge, you’ll have to adjust the saw to the 45-degree angle mark. Finish the task by placing the wood firmly in that position.
However, simple mismanagement can cost you heavily. So you must follow all safety procedures!
In this post we'll cover:
How to Cut A 45 Degree Angle with a Table Saw?
By following a proper set of guidelines carefully, you’ll be able to cut wood at your desired angle without any hassle.
So rest assured, you can cut a 45-degree angle with a table saw. Let’s get on with it!
The tools you’ll be using for this operation are:
- Table Saw like one of these (obviously!)
- Drafting Triangle
- Miter gauge/ Taper jig
- Extra scrap wood
- Measuring tool
- Pencil
For Protection: Dust Mask, Safety Glasses, and Earplugs
And if you’re ready with all the tools and safety procedures, we can now proceed to the action part.
Go through the following steps to cut one smooth 45-degree angle with your table saw:
1. Get Prepared
This preparation step is essential to get all the other steps right. Here’s what you got to do:
- Unplug or Turn off the Saw
Turning the saw off to prevent any accidents is a good choice. But unplugging it is recommended.
- Measure and Mark
Using any measuring tool, determine the width and length of your wood. And then mark the places based on where you want the angle cut. Double-check the end and start points. Now, join the marks and outline them darkly.
- Raise the Saw’s Height
The blade primarily stays at ⅛ inch. But for cutting angles, it’s better to raise it to ¼ inch. You can do so easily using the adjustment crank.
2. Set Your Angle
This step requires you to be vigilant. Be patient and calmly use the tools to set it to the right angle.
Here’s an overview of what you’ll be doing-
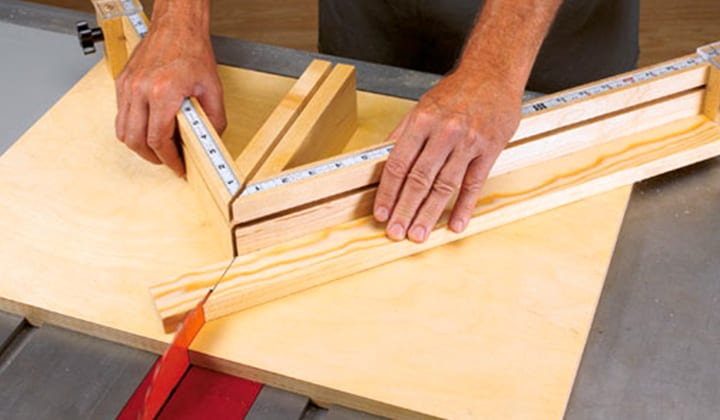
- Adjust the Angle with Drafting Triangle or Taper jig
Use the drafting triangle if you’re cross-cutting. And for cutting along the edges, go for the taper jig. Keep the space cleared so you can precisely set the angle.
- Using the Miter Gauge
A miter gauge is a semicircular tool that has different angles marked on it. Use it the following way:
Firstly, You need to hold the gauge tightly and place it against the triangle’s flat edge.
Secondly, move the gauge till its handle moves and points to the exact angle.
Then you’ll have to rotate it clockwise, so the handle locks at your 45-degree angle.
- Using the Taper Jig
Angled cuts that are done on the board edge are known as bevel cuts. For this type of cut, instead of a miter gauge, you’ll be using the taper jig.
Using a sled-style taper jig is suggested.
First, you’ll have to open the jig and press the wood against it. Next, measure the distance between the jig and the endpoints of the cut. You should be able to set your wood piece at a correct angle this way.
3. Cut the Wood
First and foremost, no matter how frequently you use a table saw, never compromise taking protective measures.
Put on all the safety gear. Use good earplugs and dust masks. With that in mind, let’s get into our final set of steps.
- Test Drive
Practice setting angles and cutting on some pieces of scrap wood before. Inspect if the cuts are clean enough and make adjustments as needed.
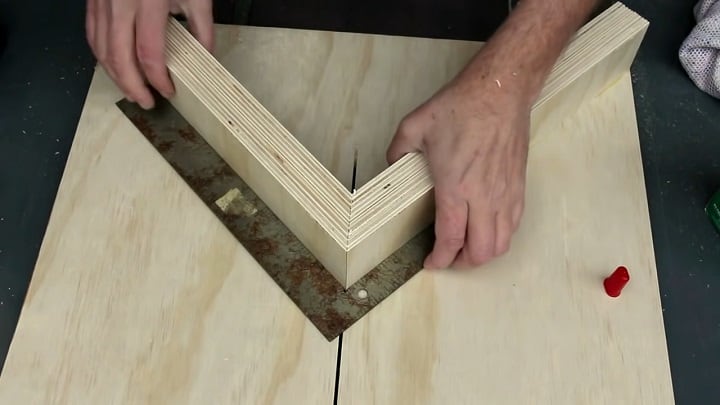
When you’re going for a 45-degree angle, it’s suggested to go for cutting two pieces together. If the pieces fit all well, it means your miter gauge is set precisely.
- Place the Wood Correctly Against the Fence
One notable feature of the table saw is its metallic fence that ensures utmost safety.
Remove the miter saw out of the way and lay the wood between the saw and fence. Keep the saw aligned with your sketched outline. It’s recommended to leave about 6 inches in between the blade and your hand.
If you’re going for a bevel cut, place the board on its end.
- Getting the Work Done
You’ve got your wood piece set at your 45-degree angle, and all you have to do now is to cut it safely. Make sure to stand behind the wood and not the saw blade.
Push the board towards the blade and pull it back after cutting. Lastly, check if the angle is all right.
And you’re done!
Conclusion
By following the correct procedures, using a table saw is as easy as a piece of cake. It’s so simple that you can seamlessly describe how to cut a 45-degree angle with a table saw the next time someone asks you about it. There are other amazing applications of table saws too like rip cutting, cross-cutting, dado cutting, etc. Good luck!

I'm Joost Nusselder, the founder of Tools Doctor, content marketer, and dad. I love trying out new equipment, and together with my team I've been creating in-depth blog articles since 2016 to help loyal readers with tools & crafting tips.