If you are going to paint rebated doors, they require a special technique, which is different than with flush doors.
In this article I’ll tell you exactly which steps you can follow for the best results.
In this post we'll cover:
What do you need to paint rebated doors?
If your rebated doors in the house do need a new coat of paint, it is important to tackle this properly.
Painting rebated doors requires a slightly different technique than painting other interior doors, because a rebated door has rebates.
First, let’s see what you need when painting rebated doors. This way you know right away whether you already have everything at home, or whether you still have to go to the hardware store.
- all-purpose cleaner
- Bucket
- Cloth
- Fine sandpaper (180 and 240)
- tack cloth
- paint tray
- Felt roller 10 cm
- Synthetic patent brush no. 8
- Stucloper 1.5 meters
- Acrylic primer and acrylic lacquer paint
Roadmap
Painting rebated doors is easy, but that doesn’t make it easy. Follow the steps closely for best results.
- degrease
- Sanding with sandpaper grit 180
- Dust-free with tack cloth
- Pre-stir paint with stirring stick
- Painting primer
- Lightly sand with sandpaper grit 240
- Remove dust with a dry cloth
- Paint lacquer (2 coats, sand lightly and dust between coats)
Preliminary work
You start by degreasing the door. Most interior doors are used on a daily basis and will have fingerprints and other marks.
Grease stains prevent the paint from settling properly. So make sure you start with a clean slate and degrease the entire door thoroughly for good paint adhesion.
You do this degreasing with B-Clean, it is biodegradable and you do not have to rinse it.
When the door is completely dry, sand it. Use 180 sandpaper and work all over the door.
In this case, dry sanding is the best option unless you have a few days to spare. You can also wet sand. In that case, make sure the door is completely dry before you start painting.
When you’re done sanding, dust everything and go over it with a tack cloth.
Before you start painting, slide a piece of stucco or newspaper under the door to catch any splatters.
If you prefer to work on a horizontal door, you can lift it out of the frame and place it on trestles or a piece of plastic on the floor.
Since a door can be heavy, it is best to always lift it with two people.
Also make sure that the room you work in is always well ventilated. Open the windows or work outside.
Also protect your clothes and the floor from paint stains.
Still got paint splatters on the tiles or the glass? This is how you remove it with simple household products
Painting rebated doors with an acrylic paint
You can paint rebated doors with a water-based paint. This is also called acrylic paint (read more about the different types of paint here).
The following applies to new untreated doors: 1 layer of acrylic primer, two layers of acrylic lacquer.
We choose acrylic paint for this because the paint dries faster, is better for the environment and color retention. In addition, an acrylic paint does not yellow.
If the rebated door has already been painted, you can paint over it immediately, without having to remove the paint.
One layer of acrylic lacquer is then sufficient. Make sure you sand in advance.
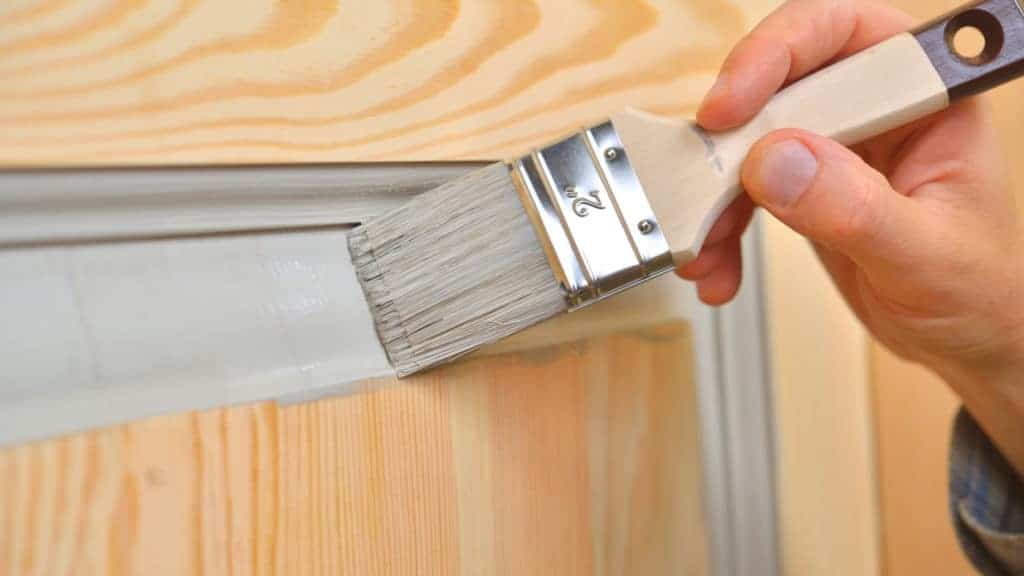
Paint the rebates first, then the rest
You need a good brush for painting. Take a synthetic patent point brush no.8 and a paint roller of ten centimeters plus a paint tray.
Before you start painting, stir the paint well.
Tip: wrap a piece of painter’s tape around the paint roller and let it sit for a few minutes. Then remove the tape. This is to remove any fluff, so that it does not end up in the paint.
Now you start with the brush first to paint the rabbets (the notches). Start on top of the door and then do the left and right sides.
Make sure you spread the paint well and that you don’t get any edges on the flat part of the door.
Then you paint the flat side with a paint roller where you can see the rebate of the door.
When you’re done with that, do the other side of the door.
If the door is still in the frame, you can secure it by sliding a wedge under the door. Once you have removed the door, carefully turn it over.
Finishing cover doors
Once you’ve primed it, take 240 sandpaper and lightly sand the door again before applying the lacquer paint.
Always allow the paint to dry thoroughly between each coat. Also make the door dust-free between each layer with the tack cloth.
Once the last coat of paint has completely dried, the job is done.
If necessary, carefully hang the door back into the frame. Again, this is best done with two people.
Do you want to save your brush for next time after this job? Then make sure you don’t forget these steps!

I'm Joost Nusselder, the founder of Tools Doctor, content marketer, and dad. I love trying out new equipment, and together with my team I've been creating in-depth blog articles since 2016 to help loyal readers with tools & crafting tips.