You can purchase outdoor furniture of amazing designs from the market but if you want to give a personal touch to your outdoor furniture and if you like to DIY new projects by your own here are some amazing outdoor furniture ideas with elaborate instructions for your review.
All of these projects are budget-friendly and you can complete these projects at home if you have a toolbox at your home.
All the projects are wooden based and so if you have expertise in woodwork you can take this project for execution.
In this post we'll cover:
5 Outdoor Furniture Projects
1. Picnic Lawn Table
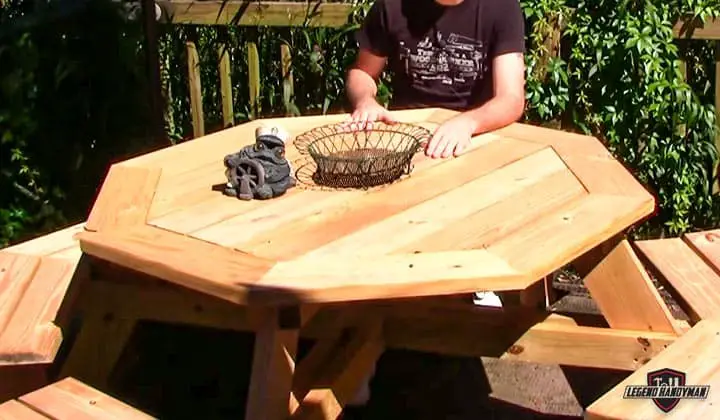
To give a practical accent to any patio a trestle style table with attached benches is a great idea. If you are an experienced woodworker you can easily make a picnic lawn table. You need the following materials for this project:
- Lumber (2×4)
- m8 Threaded Rods and Nuts/Bolts
- Wood Screws (80mm)
- Sander
- Pencil
4 Steps to DIY Picnic Lawn Table
Step 1
Start off making the picnic lawn table with the benches. At the initial stage, you have to make the measurement. After cutting you will find that the edges of the pieces are rough. To make the rough edges smooth you have to sand the edges.
After smoothing the edges assemble the benches with the aid of the screws and attach those with the connecting wood with threaded rods. It is better to screw the connecting wood 2 inches above from the ground.
If you have done all of these tasks go the next step.
Step 2
In the second step, the main task is to make legs of the X shape. Make an X shape leg following the required measurement and mark the wood with a pencil. Then drill a groove on this mark. It is better to have the mark 2/3 deep.
Step 3
Join those together with the screws and then attach the top portion of the table.
Step 4
Finally, connect the table with the bench set. Be conscious of leveling. The underside of the table’s leg should remain level with the underside/edge of the connecting wood. So, the X shaped leg will also remain 2 inches above from the ground.
2. Picket-Fence Bench
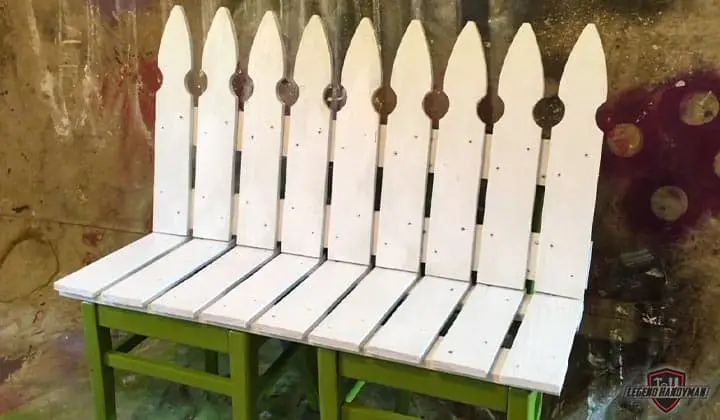
To add a rustic style to your porch you can DIY a picket fence bench there. Such a rustic style picket fence bench could add a great accent in the entrance of your home. You need the following material for this project:
- Lumber
- Hole screws
- Screws
- Wood glue
- Sandpaper
- Stain/paint
- Vaseline
- Paintbrush
The following tools are needed for this project
- Miter saw
- Drill
- Countersink bit
- Corner cat sander (here are the different types)
- Measuring tape
- Kreg pocket hole jig
For your convenience of measurement here is a cutting list (though you can make your own cutting list
- 1 1/2″ x 3 1/2″ x 15 1/2″ with 15 deg miter cut on both ends (4 pieces)
- 1 1/2″ x 3 1/2″ x 27″ (1 piece)
- 1 1/2″ x 3 1/2″ x 42″(4 pieces)
- 1 1/2″ x 3 1/2″ x 34 1/2″(1 piece)
- 1 1/2″ x 3 1/2″ x 13″(2 pieces)
- 1 1/2″ x 2 1/2″ x 9″(2 pieces)
- 1 1/2″ x 2 1/2″ x 16 1/4″ with 45 deg miter cut on both ends (4 pieces)
7 Steps to DIY Picket-Fence Bench
Step 1
Firstly, you have to take the measurement and cut the pieces according to the measurement you have taken. If you notice that the boards are rough you can smooth them by using sandpaper.
After cutting the pieces you will find the edges rough and it is better to smooth the rough edges using sandpaper before making the assembly. And for assembly, you have to drill and make a hole. You can use Kreg pocket hole jig for this purpose.
Step 2
Now measure and mark 1/2″ in with a pencil from each 13″ piece end. You are taking this measurement because the legs will inset 1/2″ in from each 13″ piece end.
Now pre-drill countersink holes with the countersink bit. These holes are for attaching the legs to the 13″ pieces with the screws. You can use either 2 1/2″ or 3″ screws for this purpose.
Important information to be noted that the legs may not fit onto the 13″ pieces and in that case, you can overhang the same amount on each leg.
Now turning the leg assembly upside down mark 2″ down with a pencil on each end of each leg. After marking pre-drill countersink holes in the outside portion of the legs at about 3″ down from the legends.
Finally, attach the 9″ pieces between the legs using 2 1/2″ or 3″ screws and you have completed the second step.
Step 3
Now you have to find out the center point and for this purpose, you have to take the measurement and mark the centerline for the length and width on the 34 1/2″ piece. Then again mark 3/4″ on both sides of the length center line mark. Repeat the same process to mark on the 27″ piece.
Step 4
Now slide 2 of the 16 1/4″ X pieces that are between the top and bottom supports. You can trim the 16 1/4″ pieces if it is necessary.
Lining up the end parts of the X pieces with the 3/4″ marks and the center line mark between them drill countersink holes in the 34 1/2″ and 27″ pieces. Then attach each X piece using a 2 1/2″ or 3″ screw.
Step 5
Flip the bench over and slide the rest of the 2 – 16 1/4″ X pieces again that is in between the top and bottom supports. Trim the 16 1/4″ pieces if it is necessary.
Now again line up the ends of the X pieces with the 3/4″ marks and the centerline mark between them as you have done in the previous step. Now to attach each X piece with a 2 1/2″ or 3″ screw, drill countersink holes in the 34 1/2″ and 27″ pieces.
STEP 6
Take a measurement of about 6″ from the 42″ board ends and to fasten the top pieces to the base portion pre-drill countersink holes.
Notice that the top is overhang 1/2″ from the 13″ pieces on the side and about 4″ from the end part. Now you have to attach the top boards to the base with 2 1/2″ screws.
Step 7
Stain the bench with a dark brown color and after staining use a little petroleum jelly or Vaseline to the corner or edge where you do not want the paint or stain to stick. The use of petroleum jelly or Vaseline is optional. If you do not want omit it.
Then give enough time so that the stain of your new picket fence bench gets dried properly.
3. DIY Cozy Outdoor Grass Bed
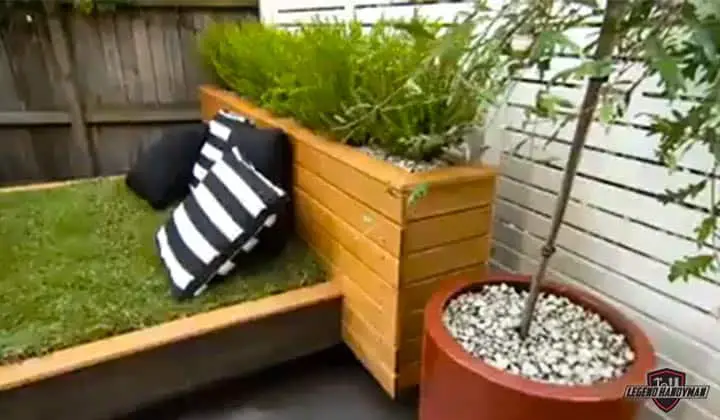
Who does not love to relax lying or sitting on the grass and the project of making grass bed is the latest idea for relaxing on the grass in a smart way? It is a simple idea but it will give you much more comfortable. If the yard of your home is made of concrete you can get the comfort of relaxing on the grass by implementing the idea of making grass bed.
This idea of making grass bed was introduced by a landscape gardener named Jason Hodges. We are demonstrating his idea to you so that you can easily bring some green onto your pavement by growing grass there.
You need the following materials for making a grass bed:
- Wood pallets
- Geofabric
- Dirt and Fertilizer
- Sod
- Pillow or cushions
4 Steps to DIY Cozy Grass Bed
Step 1
The first step is to make the frame of the bed. You can make the frame by joining a wood pallet and slatted headboard.
If you want to relax there with your wife and kids you can make a big frame or if you want to make it for your own you can make a small frame. The size of the frame actually depends on your requirement.
I personally like to keep the height of the bed less, because if you keep the height more that means you need more fertilizer and soil to fill it.
Step 2
In the second step, you have to cover the base of the frame with geo-fabric. Then fill it with dirt and fertilizer.
Geofabric will separate the dirt and fertilizer from the basement of the frame and will help to keep it clean, especially when you will water the grass geo-fabric will help to prevent dampening of the basement.
Step 3
Now roll the sod onto the ground. This will work as the mattress of your grass bed. And the main work of making the grass bed is done.
Step 4
To give this grass bed a look of complete bed you can add a headboard. For decoration and for the comfort of relaxing you can add some pillows or cushions.
You can watch the entire process in a short video clip here:
4. DIY Summer Hammock
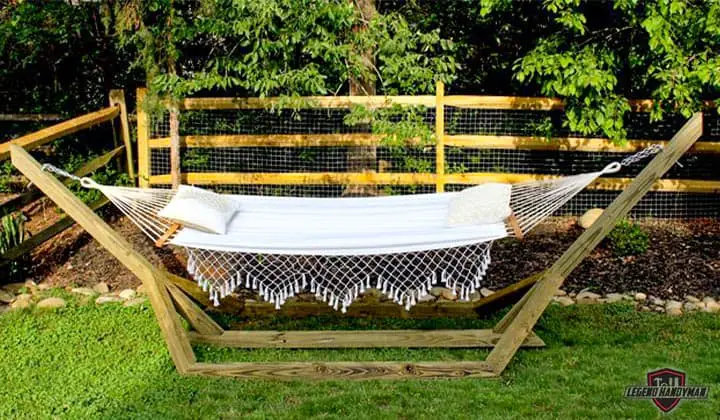
The hammock is a love to me. To make any staycation highly enjoyable I must need a hammock. So to make your summertime enjoyable I am depicting here the steps of making a hammock on your own.
You have to gather the following materials for summer hammock project:
- 4 x 4 pressure-treated posts, 6 feet long, ( 6 items )
- 4 x 4 pressure-treated post, 8 feet long, ( 1 item)
- 4-inch corrosion-resistant deck screws
- 12-inch miter saw
- 5/8-inch spade drill bit
- 1/2-inch -by-6-inch eye bolt with a hex nut and 1/2 inch washer, ( 2 items )
- Pencil
- Drill
- Tape measure
- Mallet
- Wrench
12 Steps to DIY Summer Hammock
Step 1
Take the first item of the list that is the 6 foot long 4 x 4 pressure-treated posts. You have to divide this post into 2 halves that means each half will be 3 foot long after cutting.
From one piece of a 6-foot long post, you will get a total of 2 posts of 3-foot length. But you need a total of 4 pieces of posts of 3-foot length. So you have to cut one more post of 6-foot length into two halves.
Step 2
Now you have to cut an angle of 45degrees. You can use a wood miter box for taking the measurement or you can also use a scrap piece of wood as a template. Using the pencil draw a 45-degree line on each end of all wood posts.
Then using a miter saw cut along the drawn line. One important thing I would like to inform you about cutting the 45-degree angle is that you should cut the angle inward toward one another on the same face of the post.
Step 3
After cutting the layout of the piece the overall plan for the hammock. It is wise to do this near the area where you want to set the hammock, otherwise, it will be difficult to carry the sturdy frame since it will be heavy.
Step 4
Take one of the 3-foot posts that you have recently cut down and raised it at an angle against the mitered end of one of the side of 6-foot posts. In this way, the top mitered edge of the 3-foot post will remain in level with the top edge of the 6-foot post.
Step 5
Using the 4-inch deck screws join the posts together. Repeat this step for all the four corners and attach all the four 3 foot posts to the 6-foot posts.
Step 6
To keep the edges in level position one of the end 6-foot posts laying between the 3-foot posts and position it between both angled 3-foot posts. In this way, the edges will remain in level and the mitered end will also remain in level against the horizontal 8-foot-long bottom post.
Step 7
Using the 4-inch deck screws connect the 3-foot pieces to the angled 6-foot pieces on both sides. Then repeat step 6 and step 7 on the opposite side of the hammock stand.
Step 8
To keep the edges in level with the edges of the angled 6-foot posts you have to straighten the center 8-foot post using a mallet.
Step 9
The 8-foot post should remain overhang the angled 6-foot posts by an equal distance at each end. To ensure this use a tape measure and measure the distance.
Step 10
Now screw the angled 6-foot post to the 8-foot post in four places with the 4-inch deck screws. And repeat this step to screw the other end of the 8-foot post.
Step 11
Determine the distance of about 48 inches up from the ground and then using a 5/8-inch spade drill bit drill a hole through the angled 6-foot post. Repeat this step for other angled post also.
Step 12
Then thread an eye bolt of 1/2-inch through the hole, and using a washer and hex nut secure it. Repeat this step for other angled posts also.
Then following the hammock’s instructions attach your hammock to the eye bolts and the project is complete. Now you can relax in your hammock.
5. DIY Tahitian Style Lounging Chaise
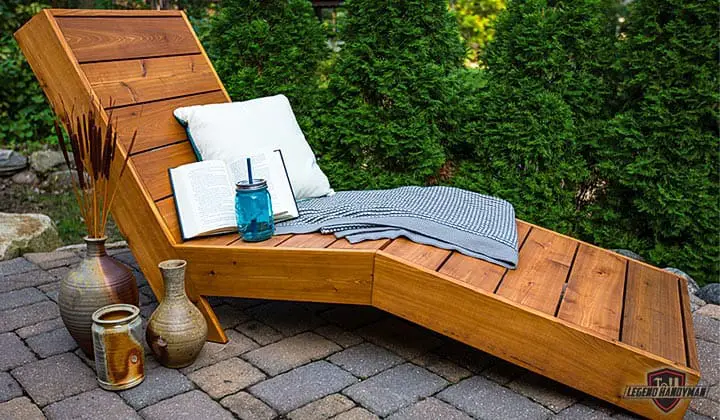
To get a flavor of resort sitting at the backyard of your home you can DIY a Tahitian Style Lounging Chaise. Do not think that it will be difficult to give the angled shape of this chaise, you can easily give this shape by using a miter saw.
You need to gather the following materials for this project:
- Cedar (1x6s)
- Pocket hole jig set for 7/8’’ stock
- Glue
- Cutting saw
- 1 1/2″ exterior pocket hole screws
- Sandpaper
Steps to DIY a Tahitian Style Lounging Chaise
Step 1
At the initial step, you have to cut two leg rails from the 1×6 cedar boards. You have to cut one end in square shape and the other end at an angle of 10 degrees.
Always measure the overall length on the long edge of the leg rail and follow this rule of measurement for cutting the back and seat rail also.
Step 2
After cutting the leg rails you have to cut the back rails. Like the previous step cut two back rails from the 1×6 cedar boards. You have to cut one end in square shape and the other end at an angle of 30 degrees.
Step 3
The leg and back rail has already been cut and now it is time to cut the seat rail. From the 1×6 cedar boards cut two seat sails to the length- one at an angle of 10 degrees and the other at an angle of 25 degrees.
When you are making seat rails for your chaise you are actually making mirror image parts that have a smooth face on the outer part and rough face on the inner part.
Step 4
Now make drill pocket holes at each end of the seat rails using hole jig sets. This holes should be drilled on the rough face of the rails.
Step 5
Now it is time to assemble the sides. During assembly, you have to ensure the proper leveling. For this purpose lay the cut pieces against a straight edge like a scrap board.
Then spreading glue attach the pieces to the leg rails and back rails using 1 1/2″ exterior pocket hole screws.
Step 6
Now cut total 16 Slats to length from 1×6 the boards. Then drill pocket holes using the pocket hole jig set at each end of the Slats and like step 4 put the pocket holes in the rough face of each Slat.
Step 7
To make the exposed face smooth sand it and after sanding attach the Slats to one side assembly. Then lay one side assembly flat on the work surface, and screw one slat on flush with the end part of the leg rail.
After that attach another slat flush with the end of the Back Rail. The 1 1/2″ exterior pocket hole screws will come to your use in this step. Finally, attach the rest of the slats, leaving 1/4″ gaps in between.
Step 8
To reinforce the joint between the Leg Rail and Seat Rail now you have to make a Pair of Braces. So, cut two Braces to length from a 1×4 board and then drill 1/8″ holes through each Brace.
Step 9
Now spread glue on the rear part of one of the braces and attach it with 1 1/4″ wood screws. There is no need to keep the brace at any exact position. The attachment of brace is just needed to straddle the joint.
Step 10
Now it is time to add the second side assembly down on a flat surface so that you can position the partially assembled chair on top of it. After that attach the Slats and ensure that each one is aligned as you go. Finally, add the second Brace.
Your work is almost done and only one step is left.
Step 11
Finally, sand it to make it smoother and apply stain or finish of your choice. To dry the stain properly give enough time and after that relax in comfort in your new chaise.
Few other DIY projects like – DIY headboard Ideas and DIY rolling pallet dog bed
Final Verdict
Outdoor furniture projects are fun. When one project is completed it really gives immense pleasure. The first 3 projects depicted here require less time to complete and the last 2 projects are quite lengthy that may need several days to complete.
To give your own unique touch to your furniture and to make your time enjoyable you can take initiative to execute these outdoor furniture projects.

I'm Joost Nusselder, the founder of Tools Doctor, content marketer, and dad. I love trying out new equipment, and together with my team I've been creating in-depth blog articles since 2016 to help loyal readers with tools & crafting tips.